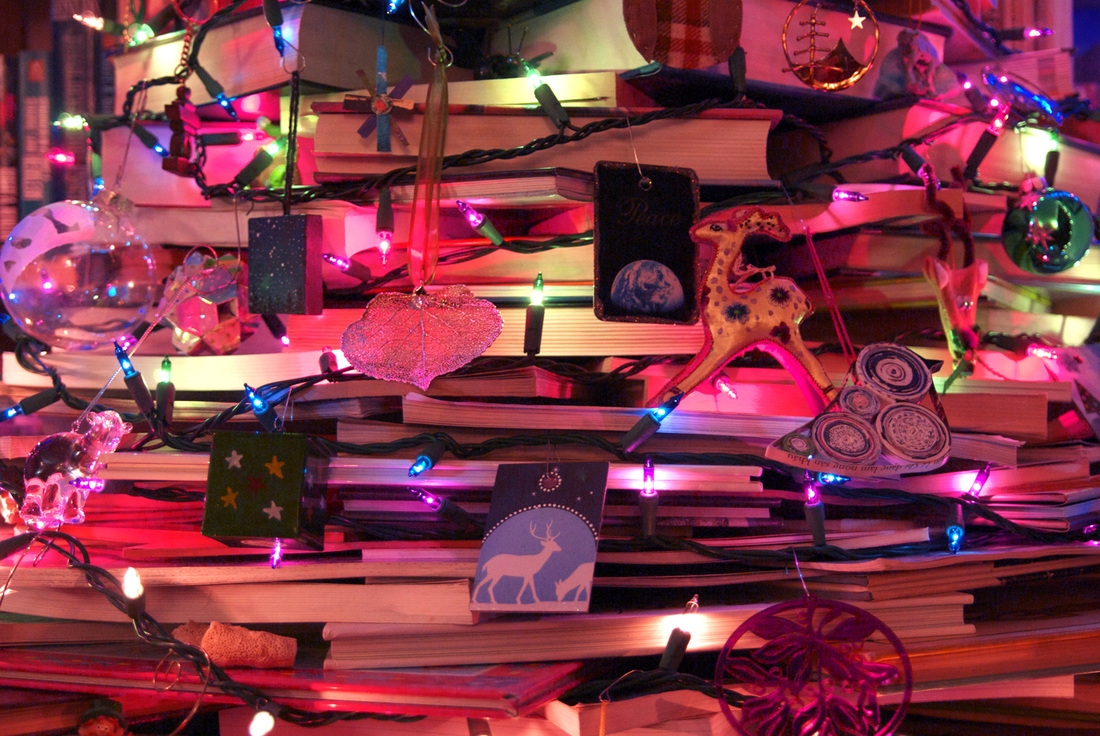
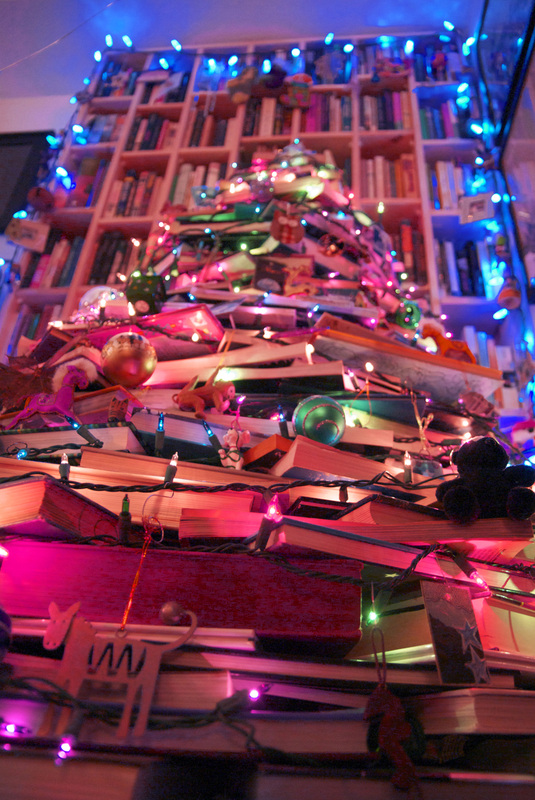
For the stacked-books effect, most sites warn that it will take more books than you think it will. Luckily, in our house, enough books is not even a little bit of a problem. Notice the still-full floor-to-ceiling bookcase behind the tree. That's not the only still-full large bookcase in the house, either.
(click to enlarge) I have no idea how many books we actually ended up using, but much of the inside of the tree is filled with books as well, to give it support. I was relieved to discover that a book I wanted to lend to a friend was one of those not in the tree, so I didn't have to a) find it in the spines-inward tree, or b) figure out how to extract it. I'm not looking forward to the post holiday season when I will have to dismantle the tree and put away all of the books exactly where they belong (when you own this many books, they don't go on shelves willy-nilly, or you'd never find them), but for now I can enjoy my tree made of very processed trees. 
I'm getting better at this Photoshop thing every day.
Of course, starting with a good photograph helps. I still don't think I'll ever be satisfied with what I can get from an old Polaroid. I was, however, surprised at how much of a difference I could make to a professional photograph. My (second) preschool class photo presumably shouldn't have needed much, and yet I was able to generate dramatic improvements. I almost don't want to tackle this restoring-all-my-old-photographs project too quickly, in case I learn some essential Photoshop skill that would have made all the difference to photographs with which I have already finished.   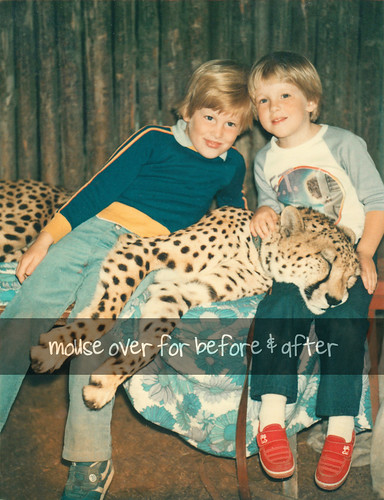 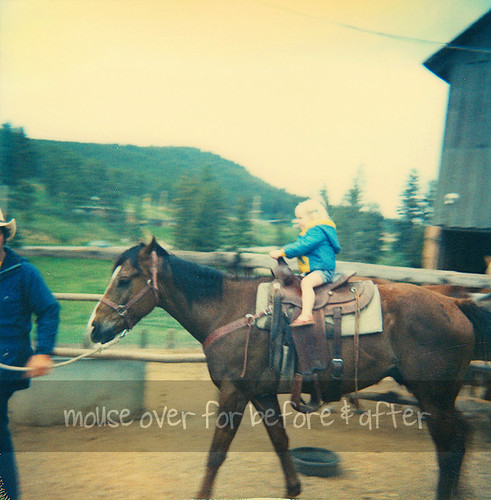
But Photoshop isn't my only trick. I also add to my HTML/CSS knowledge on a regular basis. That mouse-over business above? Yeah, just learned that today. Pretty snazzy, if I do say so myself. If you've already moused over them all and can't remember what the first image with the instructions looked like, just reload the page. Here's how to create the mouse-over effect with HTML: <img src="http://url-of-starting-image.jpg" onmouseover="this.src='http://url-of-hovering-image.jpg'" onmouseout="this.src='http://url-of-end-image.jpg'">
Most of the times I have seen this on other websites, the starting image and the ending image are the same, and that's probably what I'll do in the future so I only need two images instead of three. As far as where your image ends up on your page and how big it is, you'll have to play with that a little bit. I added a height=### attribute to mine to make them all line up nicely. You could also try tables.
Oh, and in case you're wondering: yes, that's a real, living, non-drugged cheetah. But isn't my awesome E.T. shirt really the better part of that photograph anyway? 
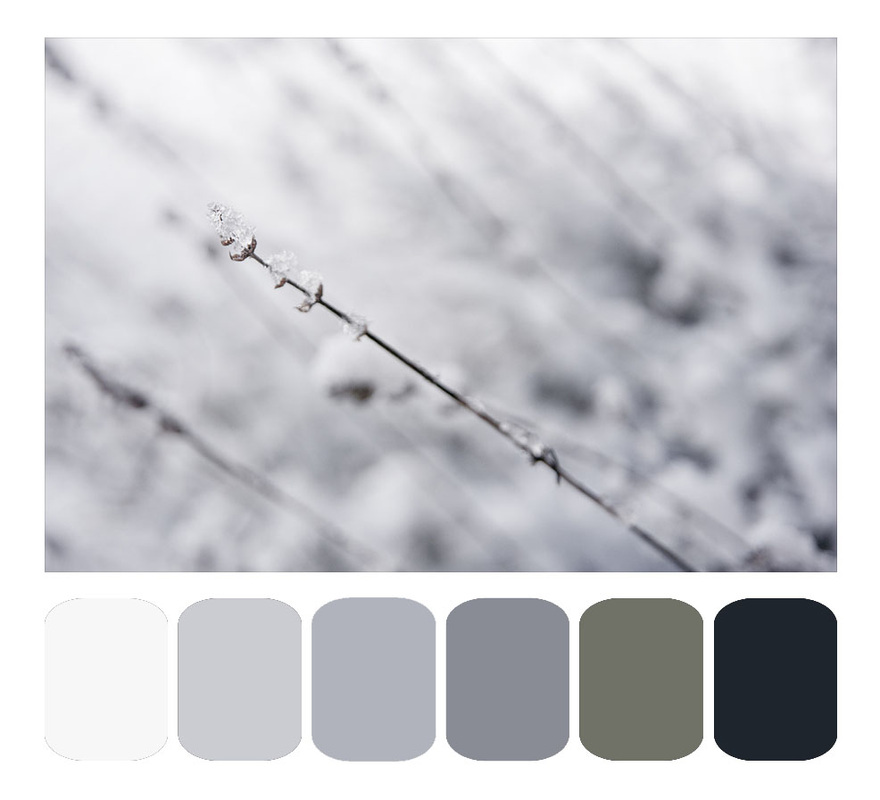
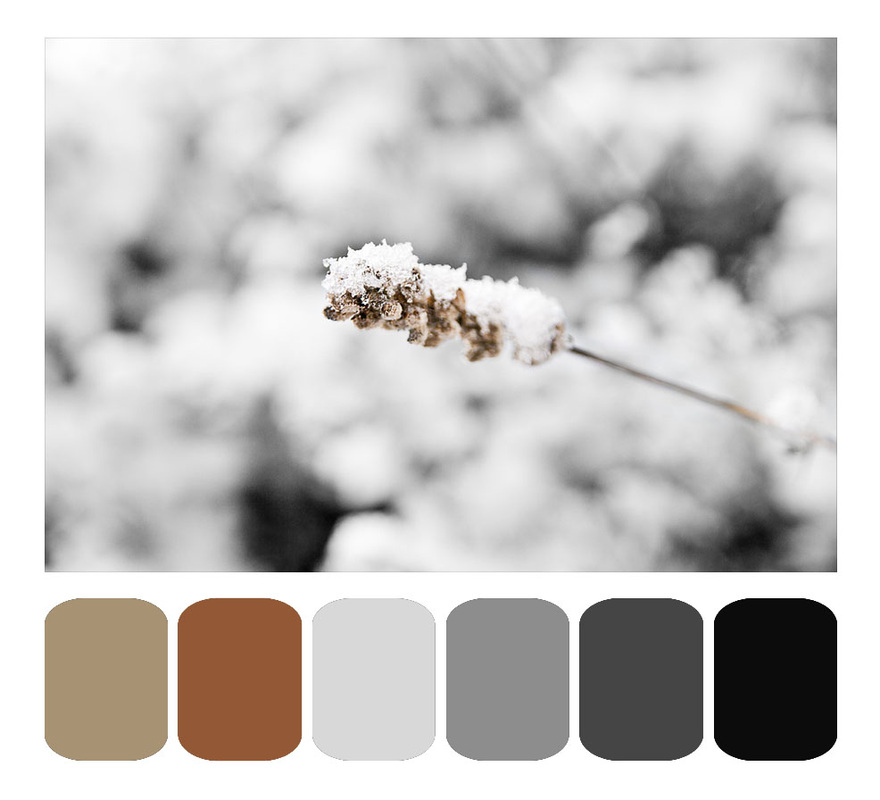
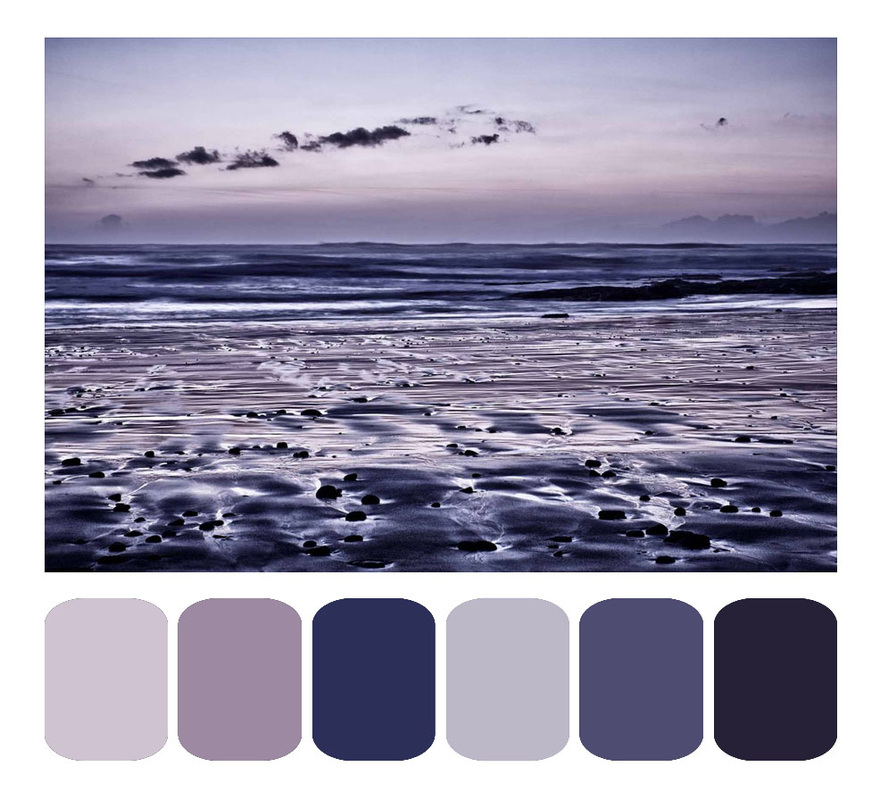
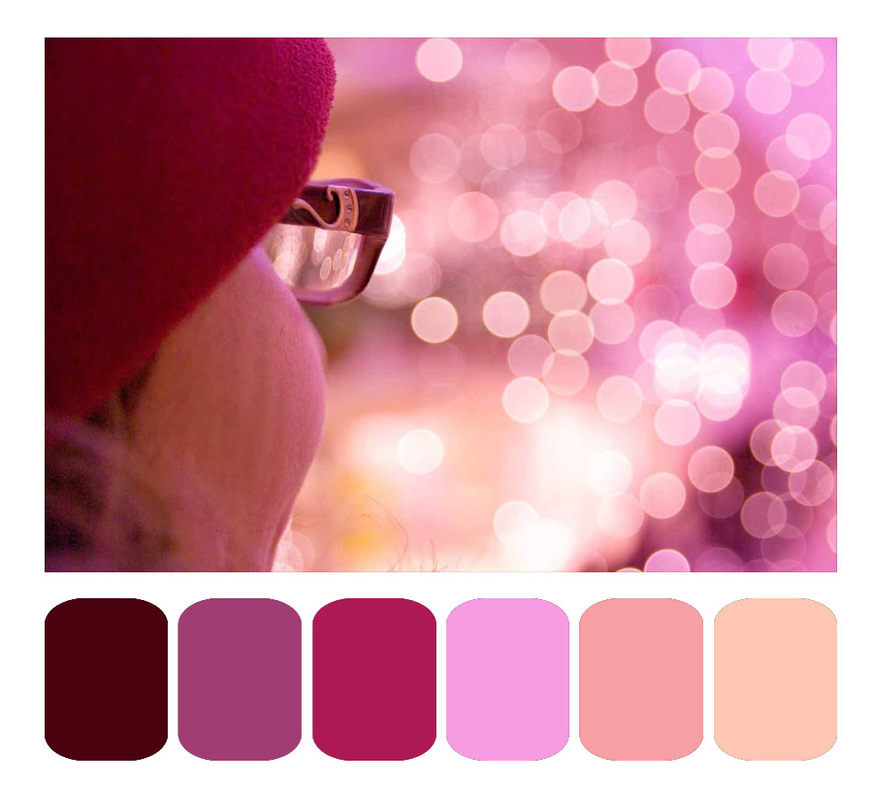
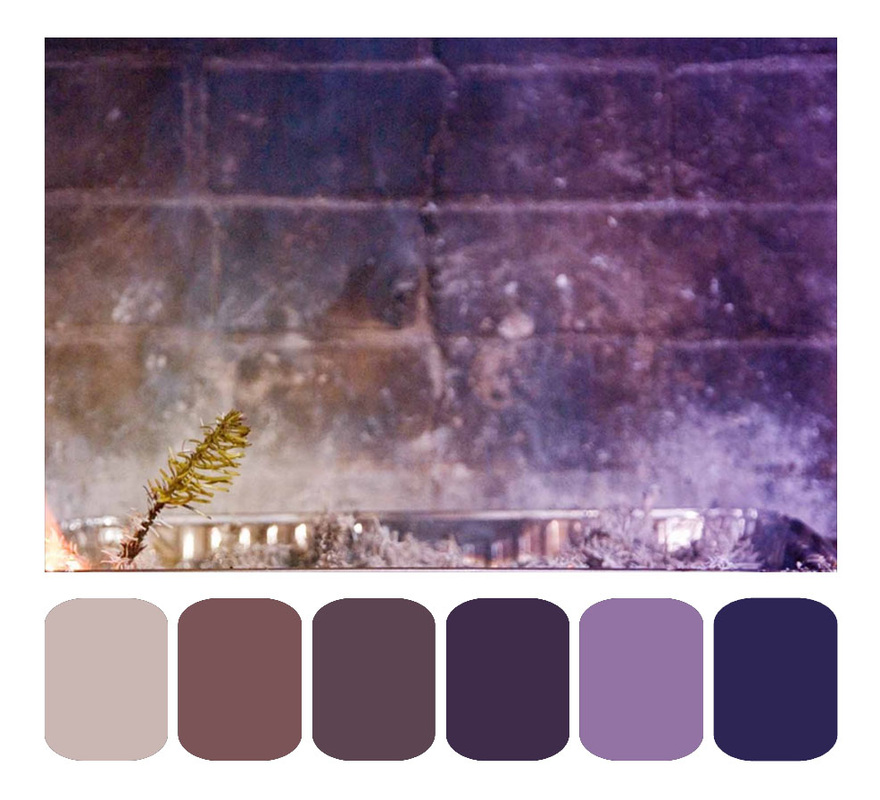
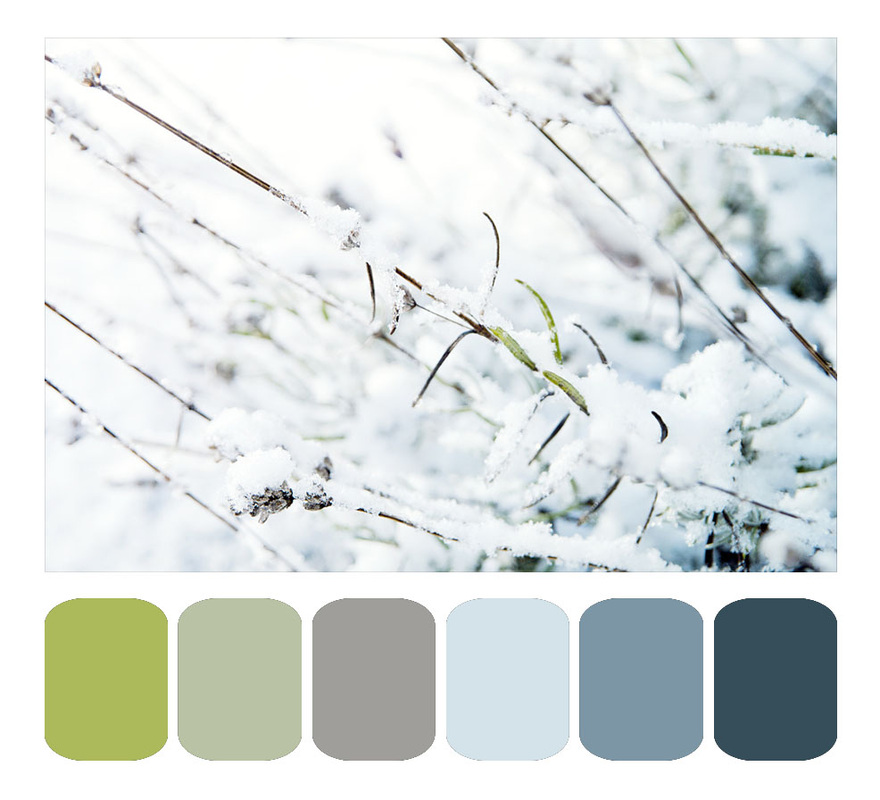
I've noticed, on Pinterest, that much of what people tend to pin are examples of what they wish their life looked like. A beautiful photograph is occasionally accompanied by several of the key colors extracted from the palette of the photo and arranged like a paint chip.  This is, of course, quite useful in making one's life more like a beautiful photograph. You could decorate a room with a color scheme that makes you feel just as looking at the photo does. You can also do this with photographs of outfits you like. Maybe it's not the specific clothing items you prefer, but the color scheme involved in the ensemble. Time to extract those colors and see what it looks like. There are some programs out there on the web that will do this automatically for you. The problem with them is that they choose either all the colors (way more subtle hues than you know what to do with), or they choose the 12 most common colors or so. The latter seems like an OK idea, but in the case of the tropical shot below, the 12 most common colors in the photo are all shades of turquoise. The sand isn't prominent enough to get top billing. Plus, those programs show you the colors, but don't make for a lovely pin-able color scheme.
So, a solution. Two free downloadable Photoshop templates. Choose either horizontal or vertical orientation (or both, if you want to have both handy for future use—all of the above examples are horizontal. The vertical template has the paint chips on the right).
When you're finished, choose "flatten image" from the layers menu, and Save As a .jpg for the web. If you accidentally save over the original template, just pop back over here and download yourself another. Feel free to use the downloadable template for any personal or commercial purposes, but do not redistribute the template itself; tell others where you got it instead.  
So, you've probably already packed up your lights for the year, but keep this trick in the back of your mind for next year.
I don't know what made me try this in the first place 15 years ago, but now I would never store strings of lights any other way. In 15 years, I have never had a string of lights tangle, and I can find the specific string I'm looking for the first time, every time. This system cost me $2.99. Once. 15 years ago.
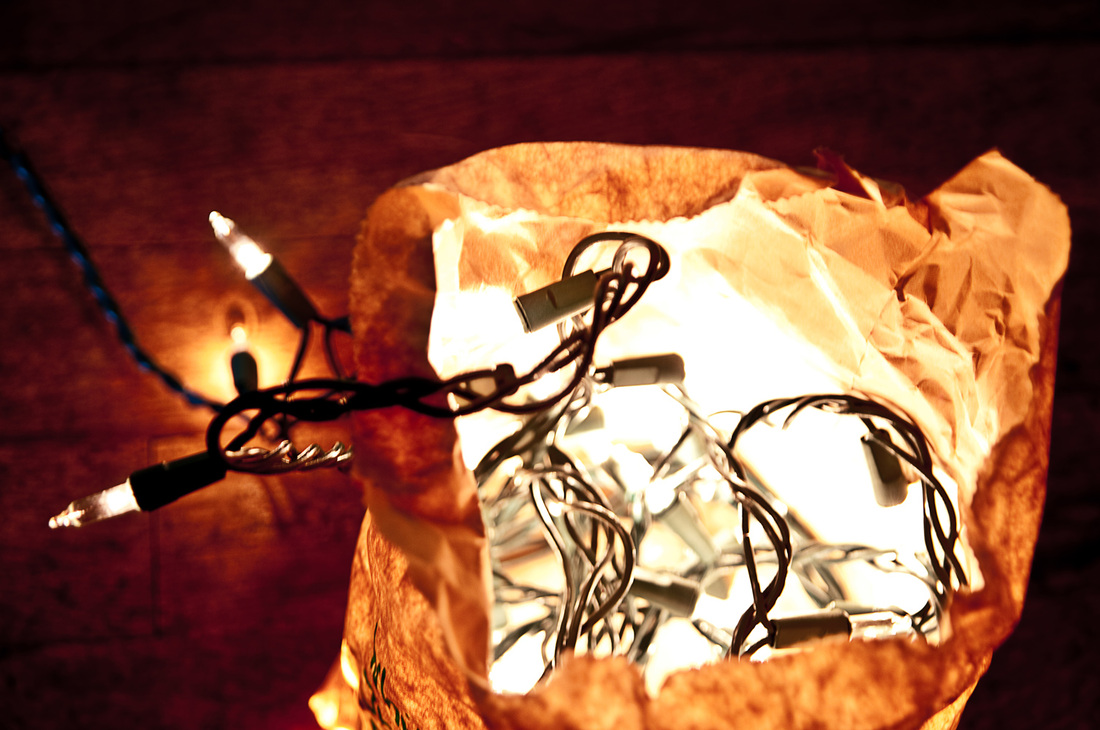
Ready for the secret? Lunch-sized paper sacks. Buy one package of them and keep them with your holiday decorations. You'll still have some left over in a few decades.
Put each strand of lights in its own paper sack. Feed the lights in like you're stuffing a sleeping bag into a stuff-sack, don't roll them up or fold them or bunch them first. This is part of the secret. Start with the non-plug end at the bottom of the sack, so the plug always comes out first. 
Need to test a light strand? No need to remove it from the sack, just pull out the plug end a few inches and plug it in. Don't worry about a fire hazard, the lit lights won't be in the sack long enough to matter. In 15 years, I've never had a sack even start to get brownish from lit lights.

Another brilliant aspect of this system is easy labeling. I always include on my sacks:
1. Number of lights in the strand 2. Color of bulbs 3. Color of cord (green looks good on the tree, white looks good against white walls) 4. "Plugs one end" or "Plugs both ends" for decoration planning purposes 5. Any other distinguishing characteristics (like "LED" or "icicle style" or "faded color" or even how you typically use them, like "goes above the fireplace") You can fit a remarkable number of these paper sacks full of lights into a large plastic tub, with other holiday decorations or by themselves. The sacks are also conveniently squishy, so you can really pack them in to any available space. Next year when you pull them out, you'll know exactly what you've got without even opening any sacks. Throw away (or recycle) all those stupid plastic clips and cardboard boxes the lights came in but never fit back into. One flimsy paper sack will last for many years (I use the same ones over and over again. I've replaced a few over the years, but not many; the sacks tend to last longer than the lights themselves). One more bonus: decorating the tree is easier. Pull out the plug end and plug it in. Keep the sack full of lights in your hand as you walk around the tree, feeding out only as much of the strand as you need for that part of the tree. The tail end of the strand won't get caught on lower branches, or, you know, the cat. Work in reverse to take the lights down. 
   
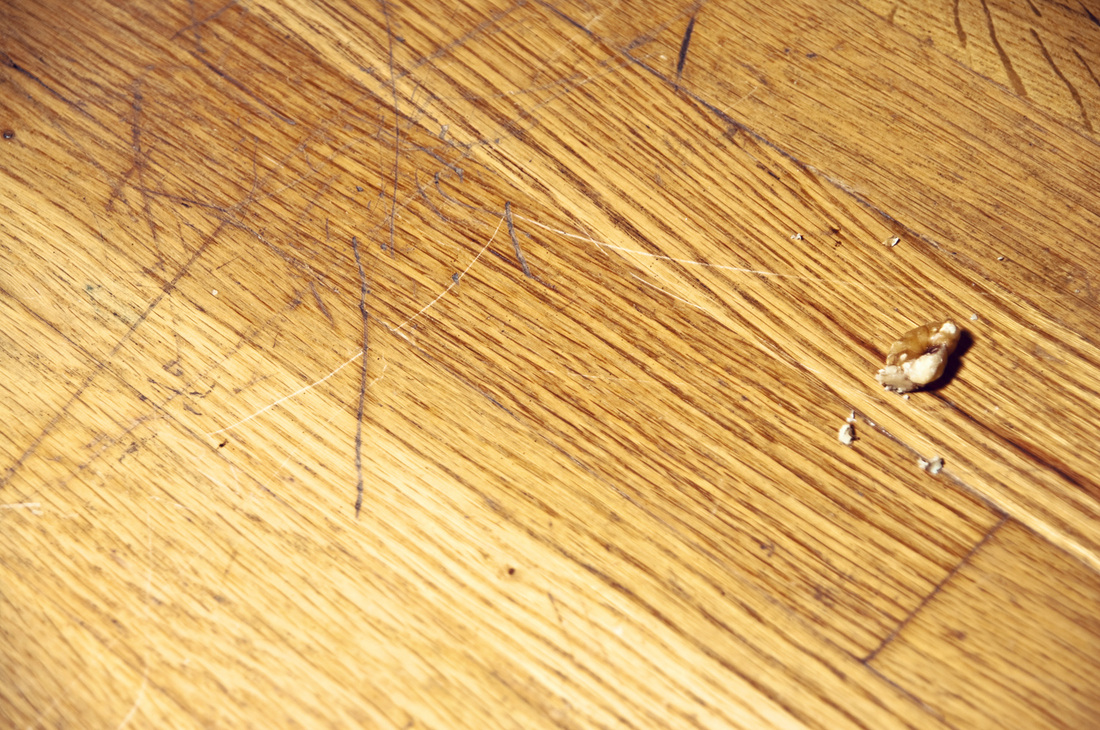
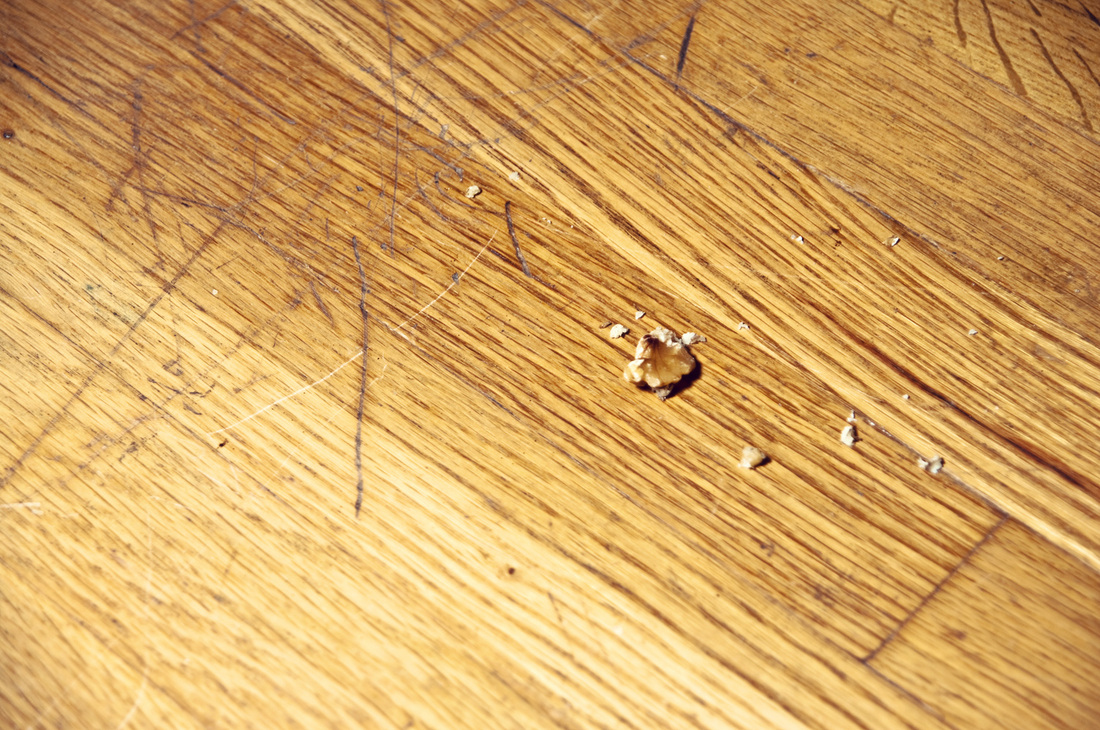
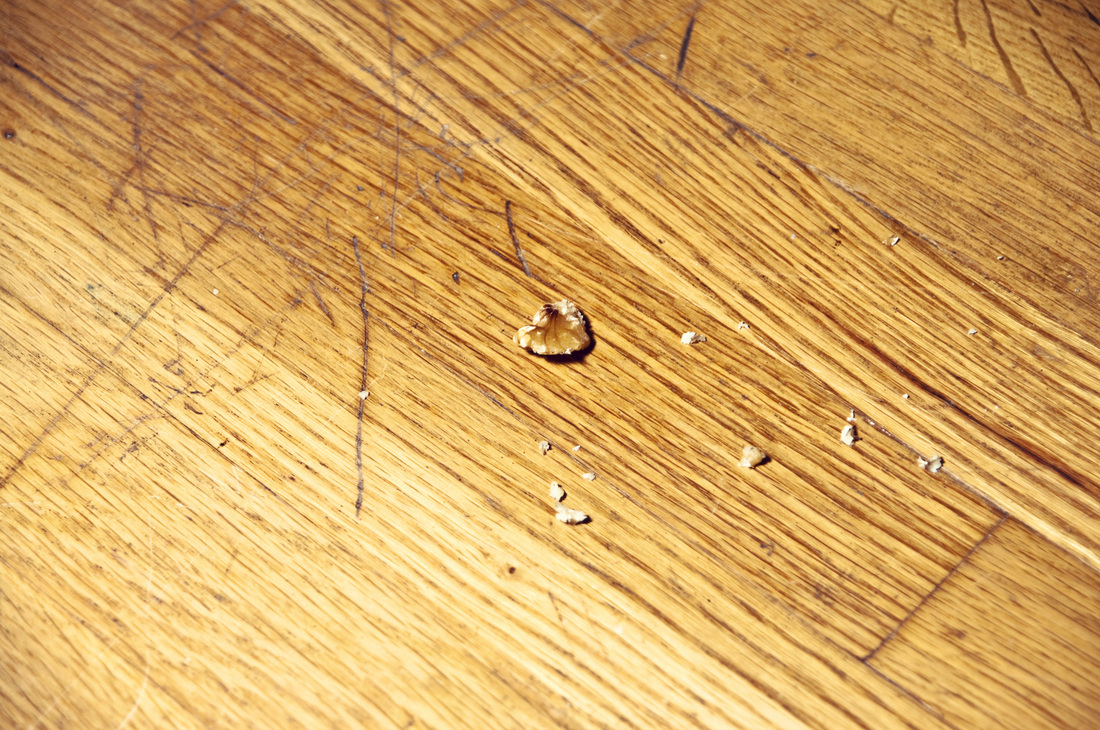
How to erase scratches in wood floors and furniture with a walnut:
Let me start by saying that the example floor you are about to see is not in the best condition. I decided a year or two ago to remove the hideous blue stained wall-to-wall carpet from the house, and I love the results. Under the blue crusty monstrosity, there were lovely honey-colored wood floors. The wood was infinitely better than the carpet. But—the floor itself was fairly scratched and stained. This walnut trick works better with new scratches; not so much with scratches that have existed underneath wall-to-wall carpeting for 30 or 40 years.


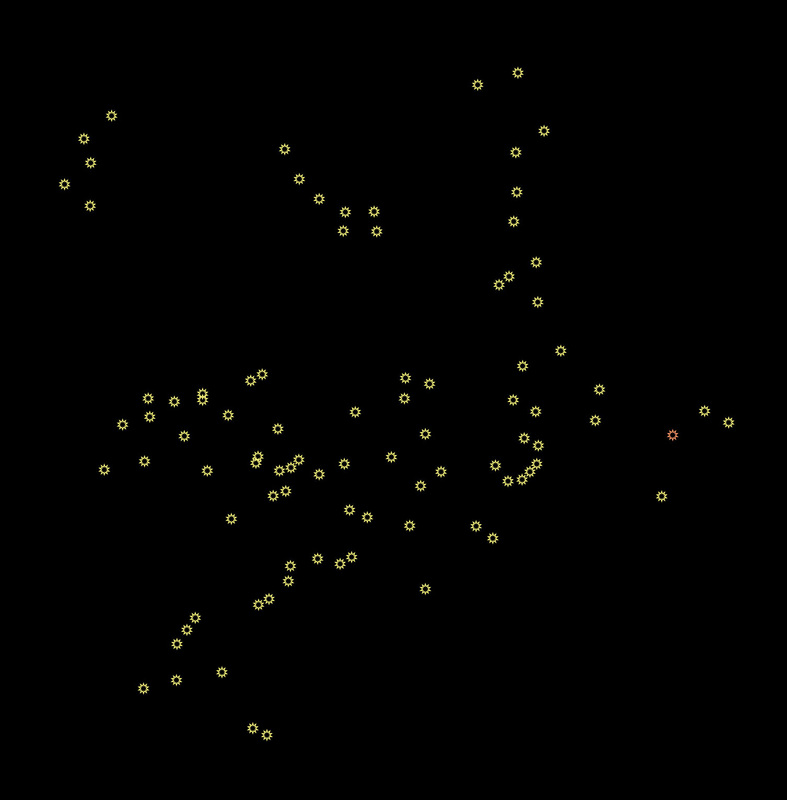
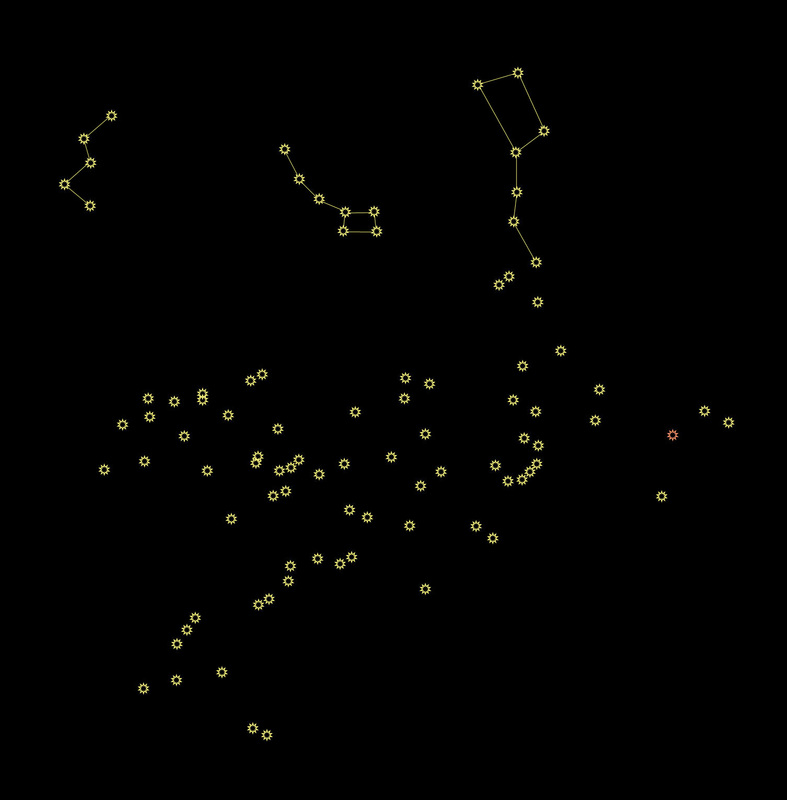
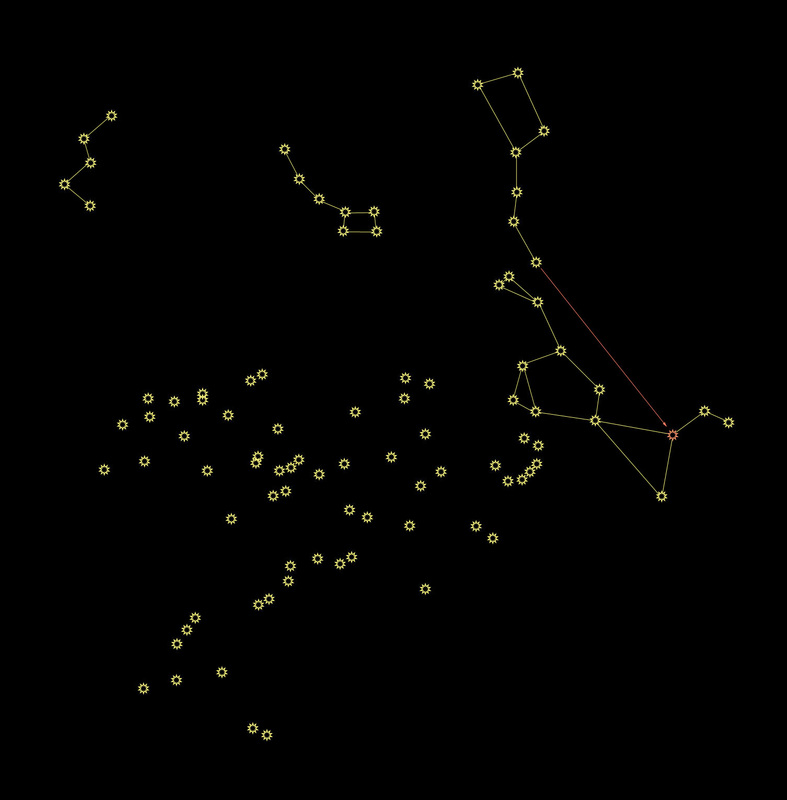
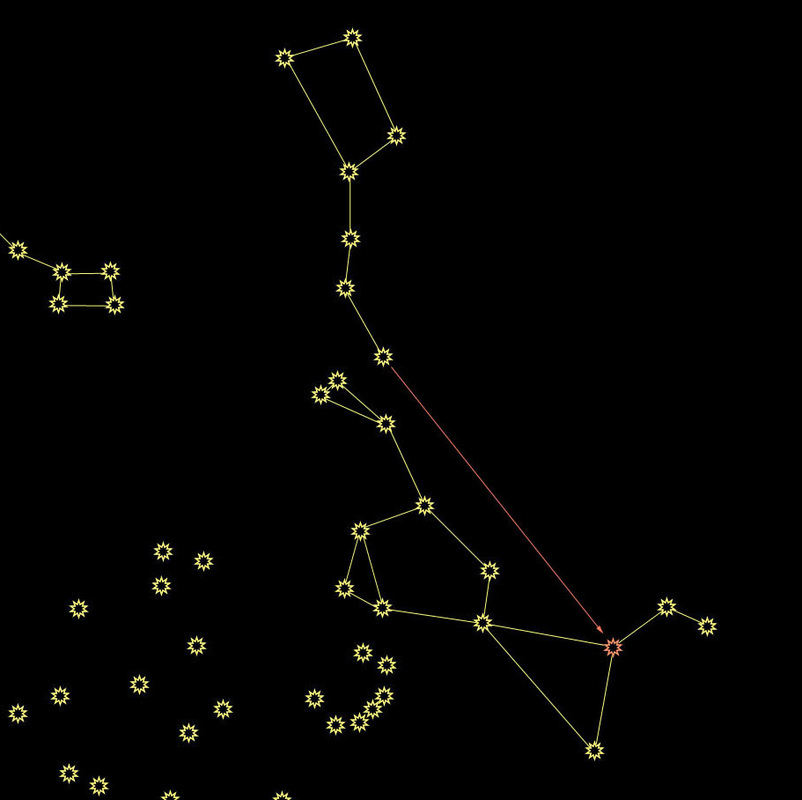
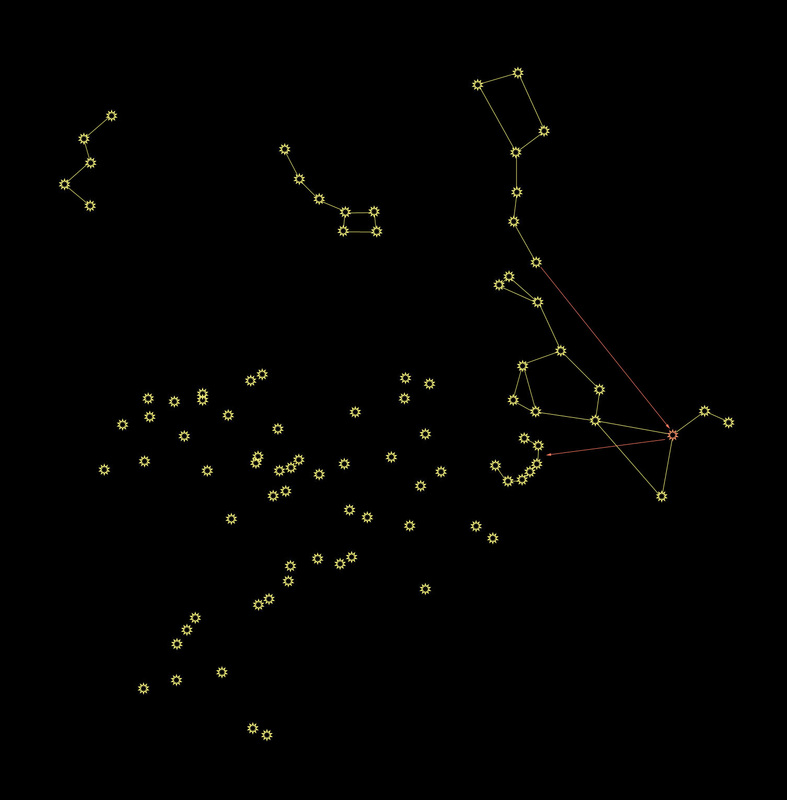
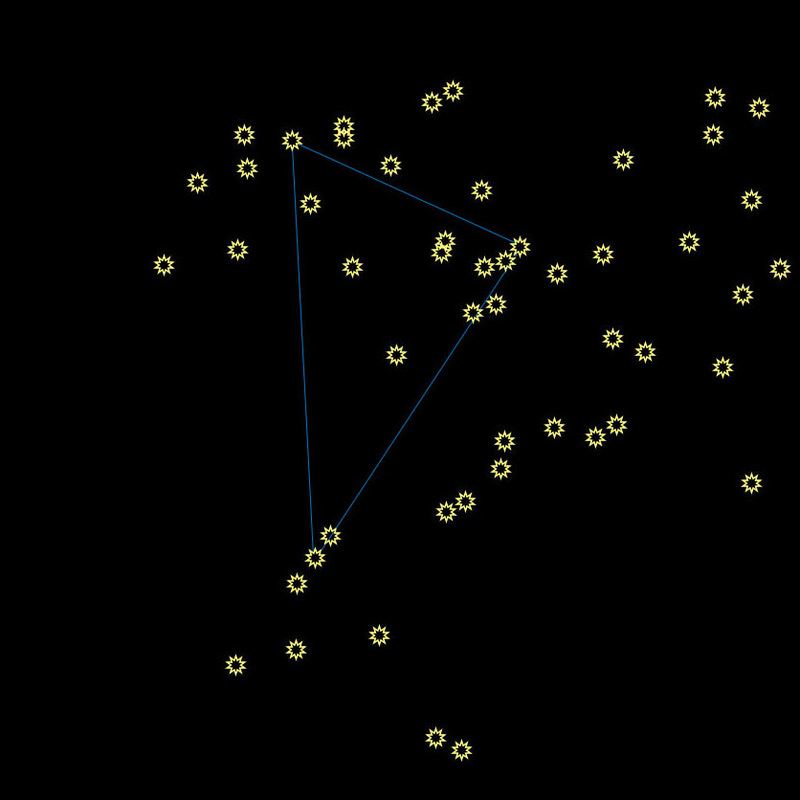
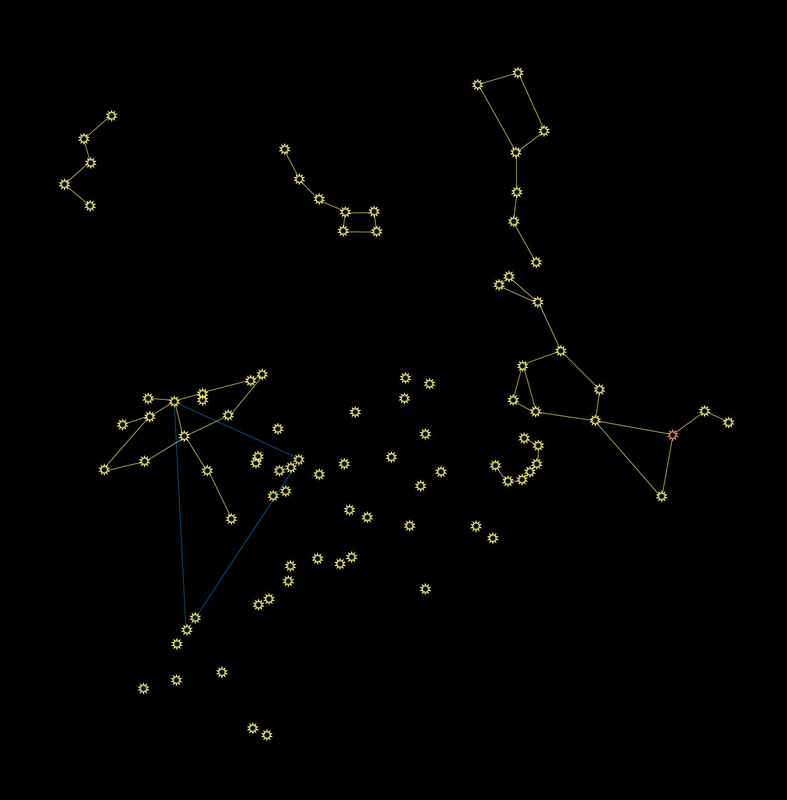
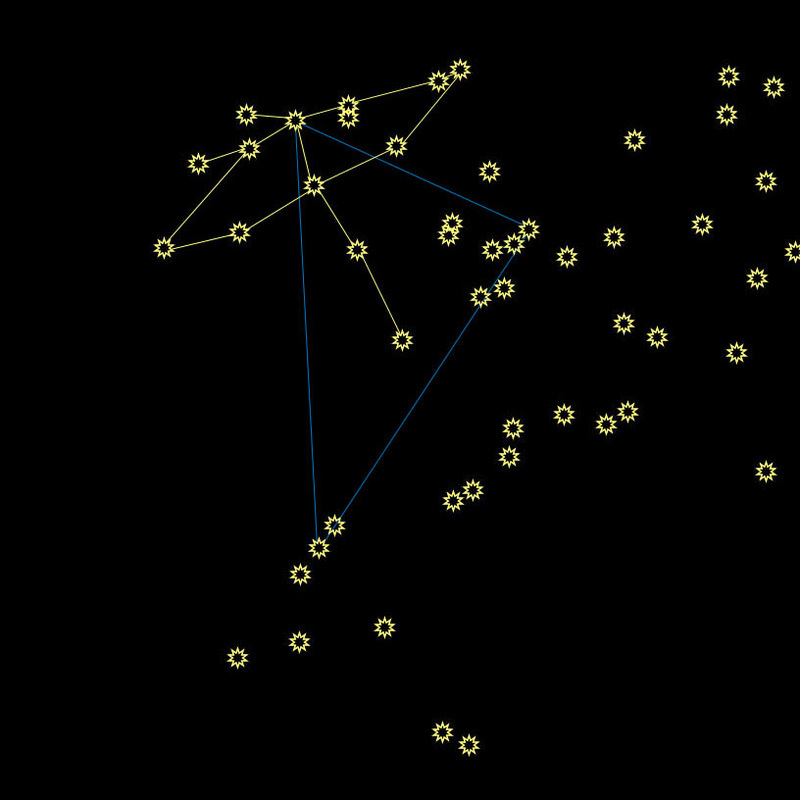
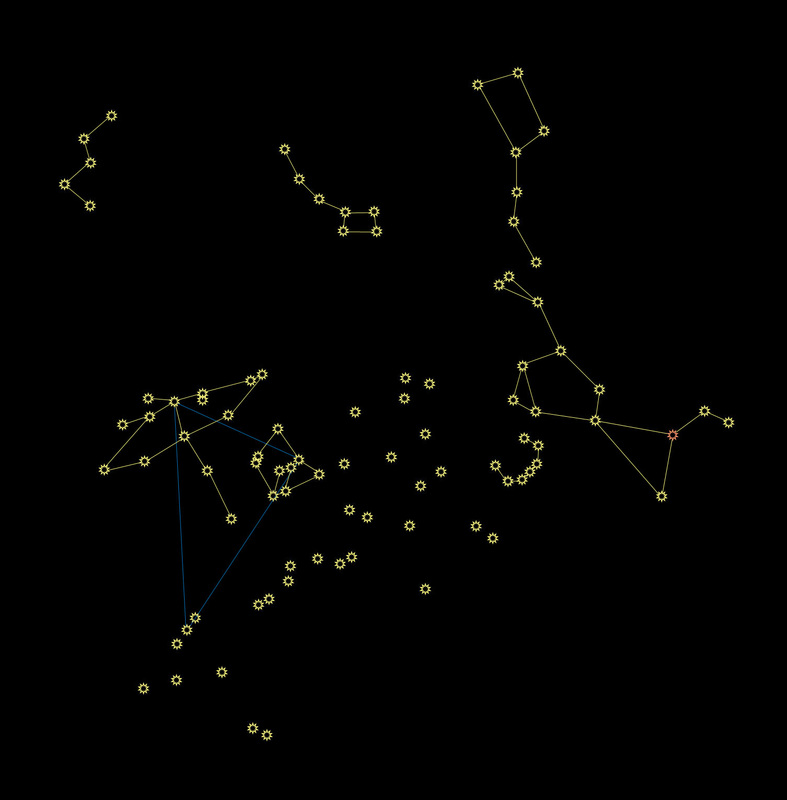
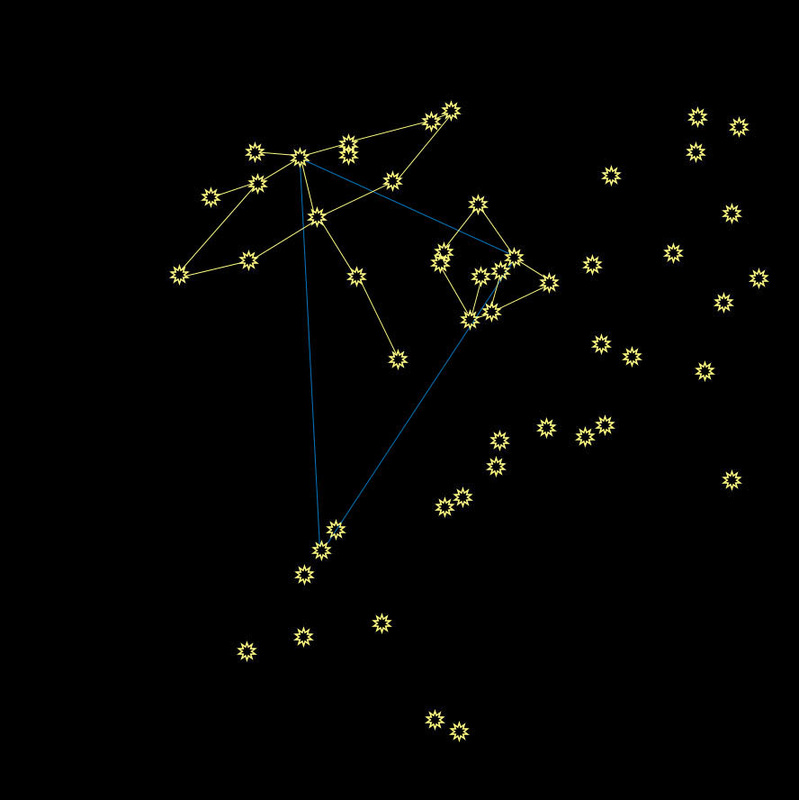
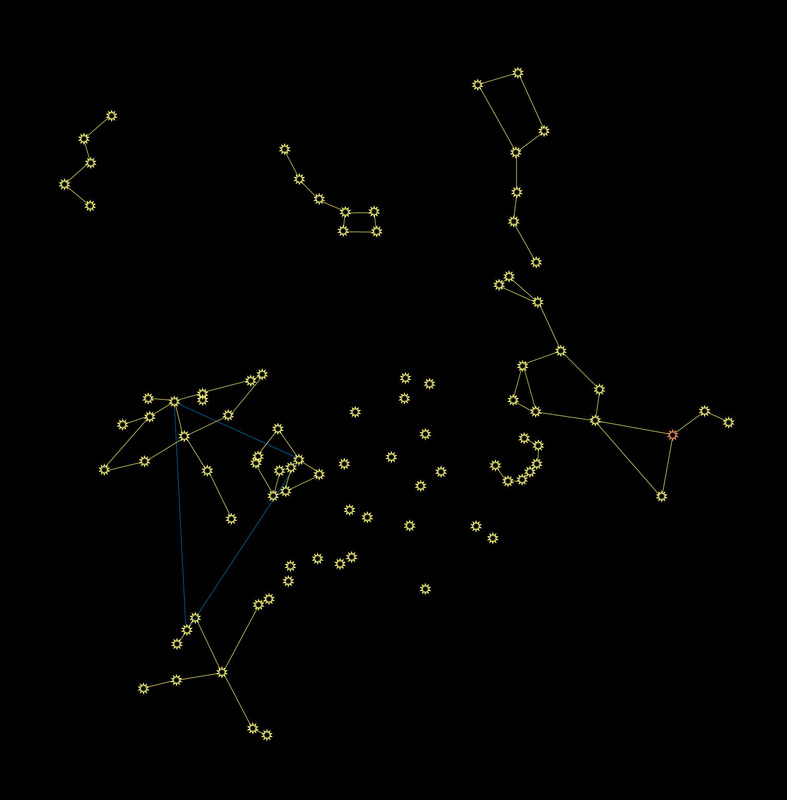
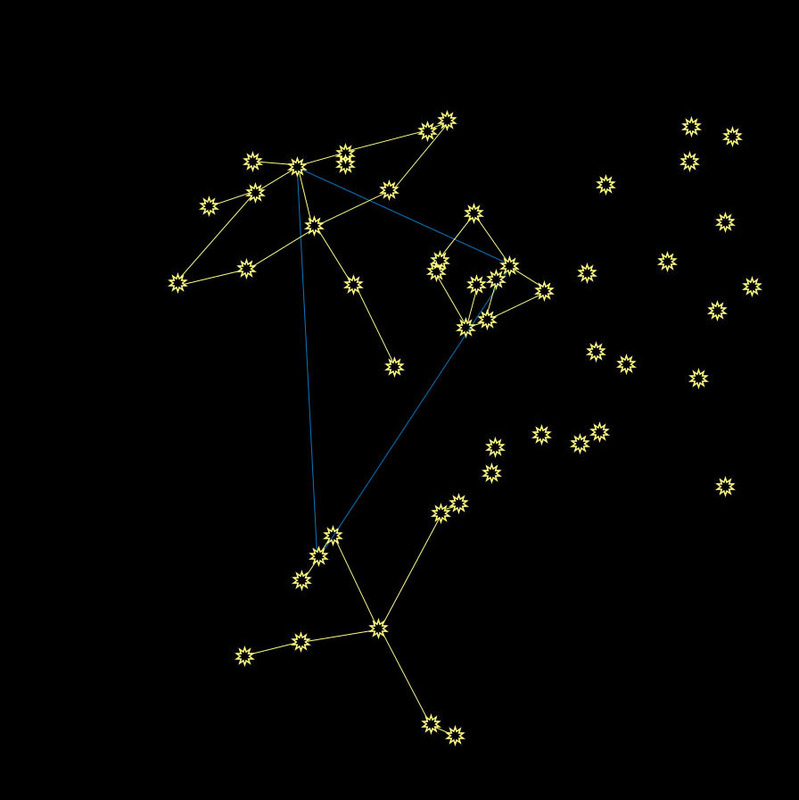
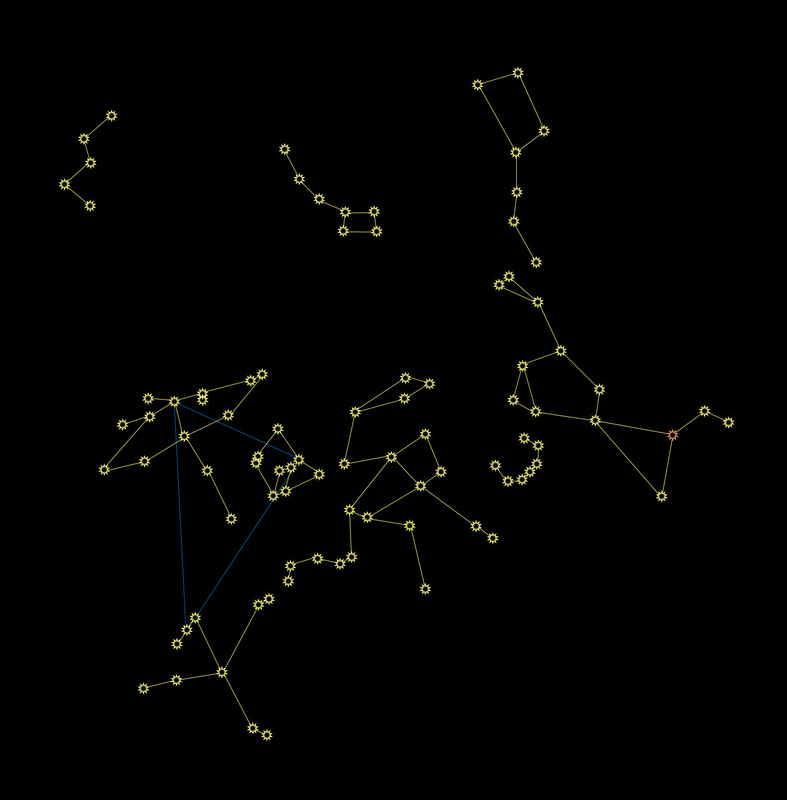
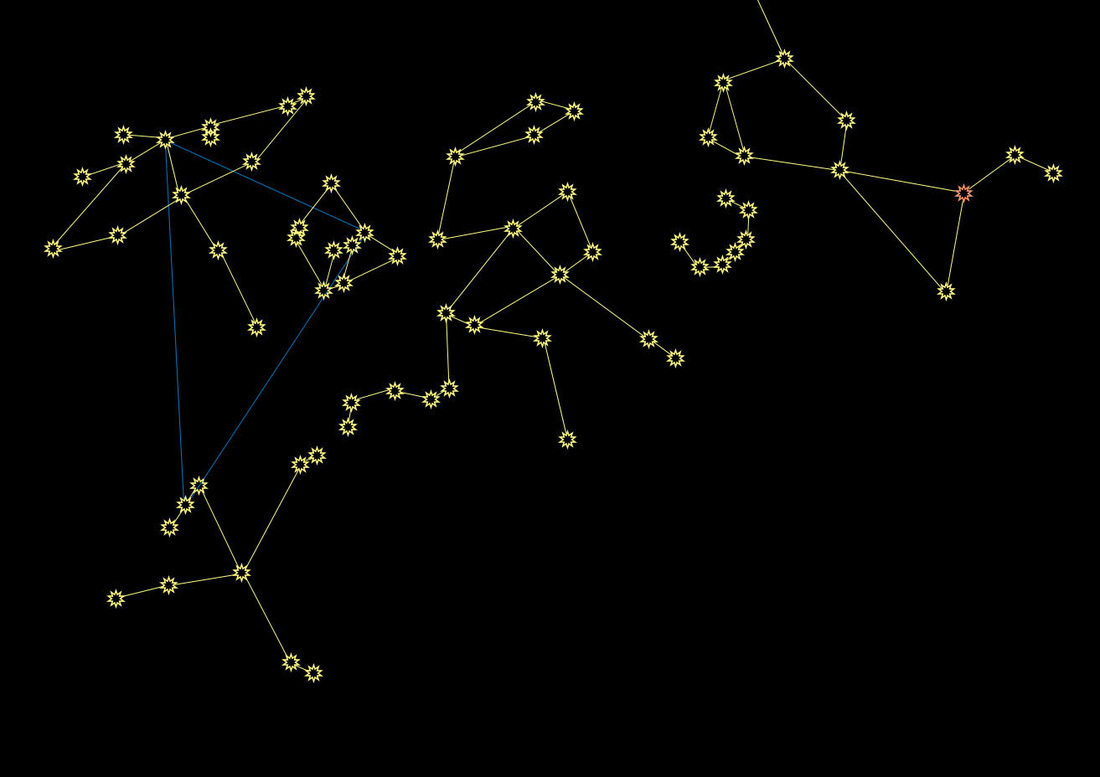
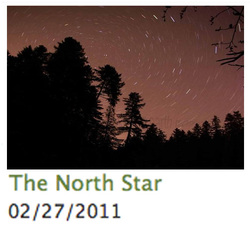
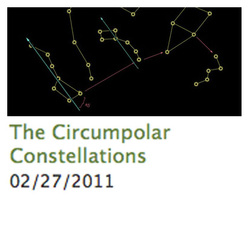
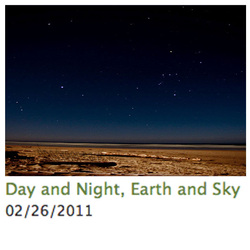
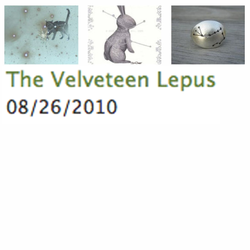
Now Available in E-Book and Paperback! If you haven't already, please start by reading Lesson 1: The North Star, Lesson 2: The Circumpolar Constellations, Lesson 3: Elegant Orion, Lesson 4: Ask Orion for Directions, and Lesson 5: Sweet Summer Sky before proceeding. The Zodiac Constellations are a group of 12 constellations that fall on either side of the ecliptic. The ecliptic is the path that the sun traces through the sky, from the perspective of Earth, throughout the year. Put another way, if you were to take a giant celestial crayon and draw a line through all 12 Zodiac Constellations, you would end up drawing a ring in the sky that goes all the way around the Earth. The sun would always be near that ring, as would all of the planets (not Pluto, though... add that to the ever-lengthening list of reasons Pluto is only a "plan-ette"). 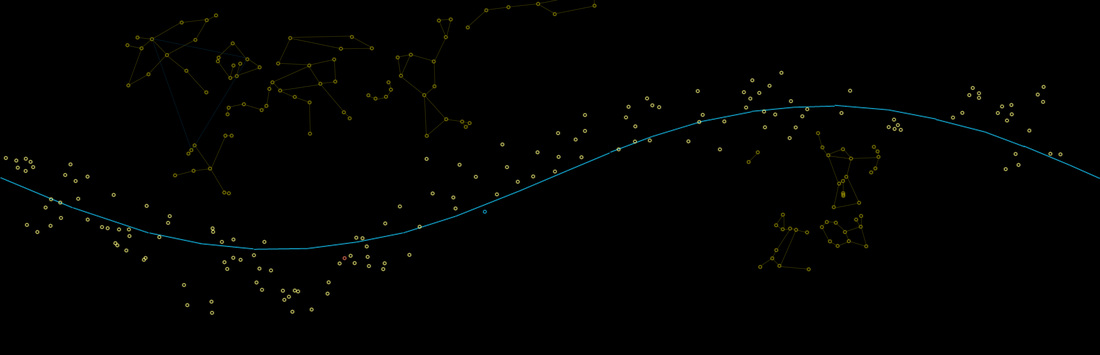 Above, you'll see the ecliptic in blue, with the associated constellations. I've added other constellations we have learned so far, so you can get your bearings. The bottom part of the Big Dipper is just peeking through at the top of the picture in the center. Below is a video that quite effectively shows the relationship between the Earth, the Sun, the ecliptic, and the Zodiac Constellations. The upper right corner shows which constellation is being highlighted, and the bar at the bottom shows the time of year. Notice that if it's night time on Earth (facing away from the sun) then the Zodiac Constellation you see in the video will not be visible, because it is "up" during the daytime. You'll have to wait 6 months for that constellation to be visible in the dark. The music is nice and soothing, but beware: the end of the video will audibly jar you back to reality. We'll go through each of the 12 Zodiac Constellations below, traveling to the "left" along the ecliptic as we go. Some Zodiac Constellations can be found using others we've learned about, but others you may just have to learn to find on your own. When you're stargazing, if you can find any two Zodiac Constellations, you know that the ecliptic goes through them and continues on either side. Use that knowledge to find any others that might be visible at that moment. 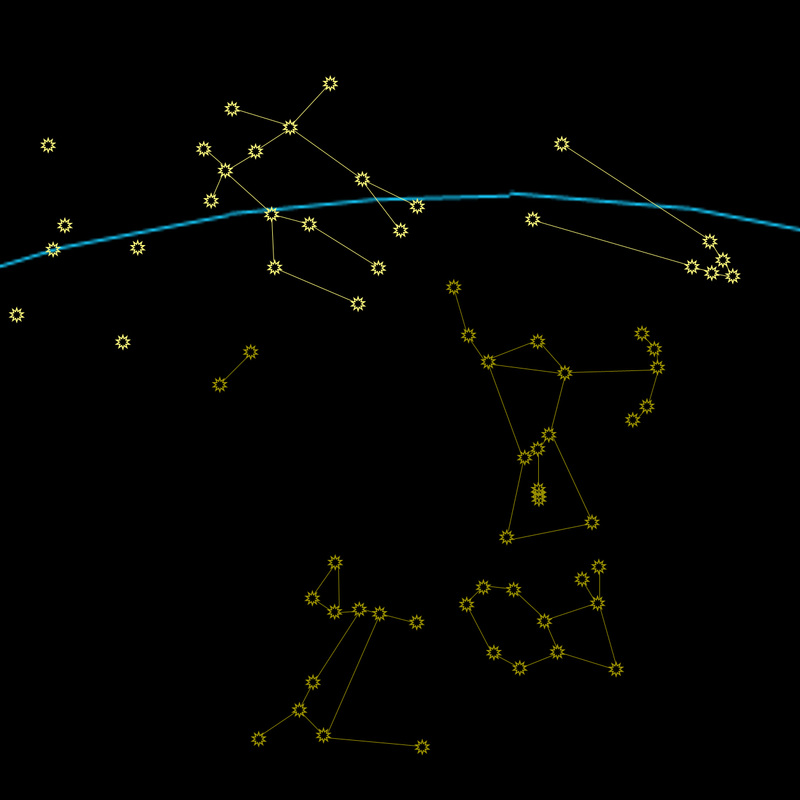 Taurus, the Bull: We're already familiar with this one. Remember, you can use Orion's belt to find Taurus's nose. Follow the belt up and to the right. Gemini, the Twins: We are also already familiar with the twins. Find the blue star Rigel, in Orion's ankle, and the red star Betelgeuse, in Orion's shoulder. Connect them and continue to find Gemini. 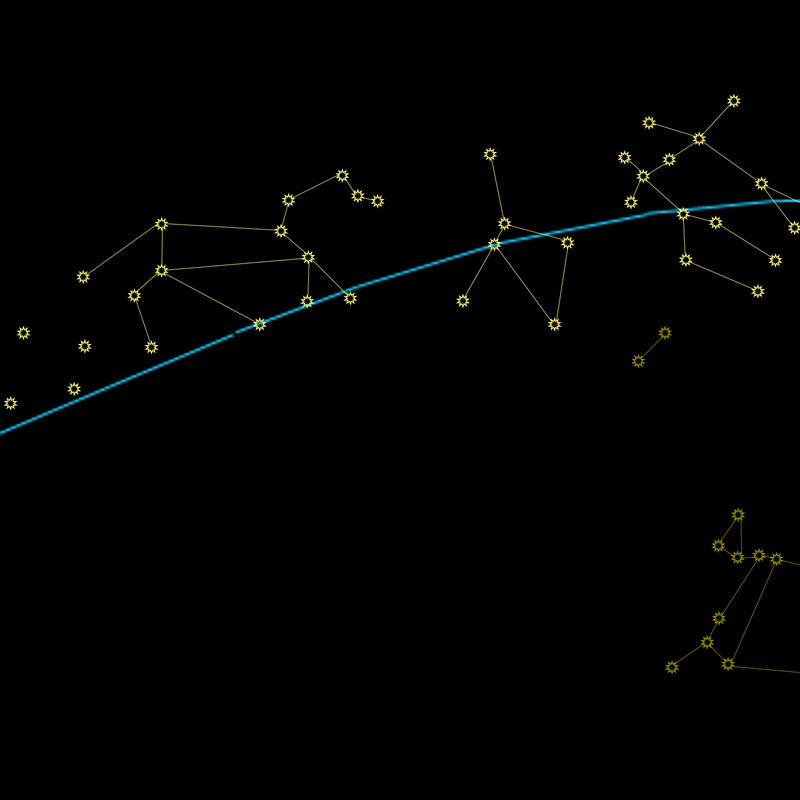 Cancer, the Crab: Next to Gemini, you'll find Cancer. The stars in Cancer are very faint, so he'll be difficult to see most nights. The easiest way to find him is to find Gemini and Leo, and then look between them. Leo, the Lion: Leo's head, neck, and front left foot form a distinct backwards question mark shape. That shape will be your key to finding Leo in the sky. Those stars are brighter than the rest of Leo. 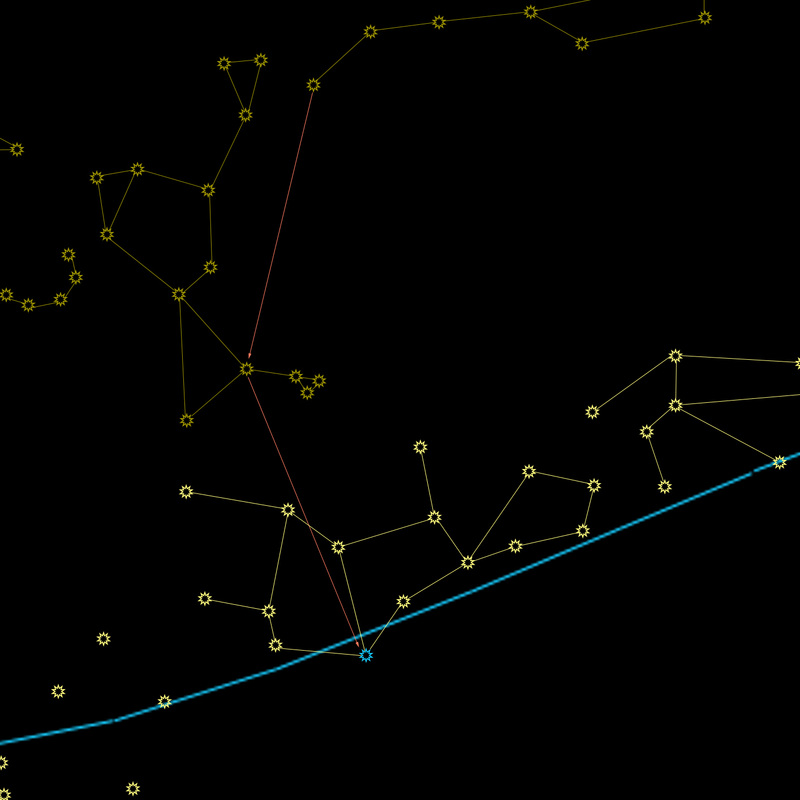 Virgo, the Virgin: Find the handle of the big dipper, and follow the arc to the red star, Arcturus. Now, instead of bouncing back up to Corona Borealis, "spike down" to a blue star, Spica (SPAI-kuh). Spica is a fairly bright star, and is the only bright star in Virgo. Frequently, you'll be able to find Spica, and be unable to find any other stars in Virgo. 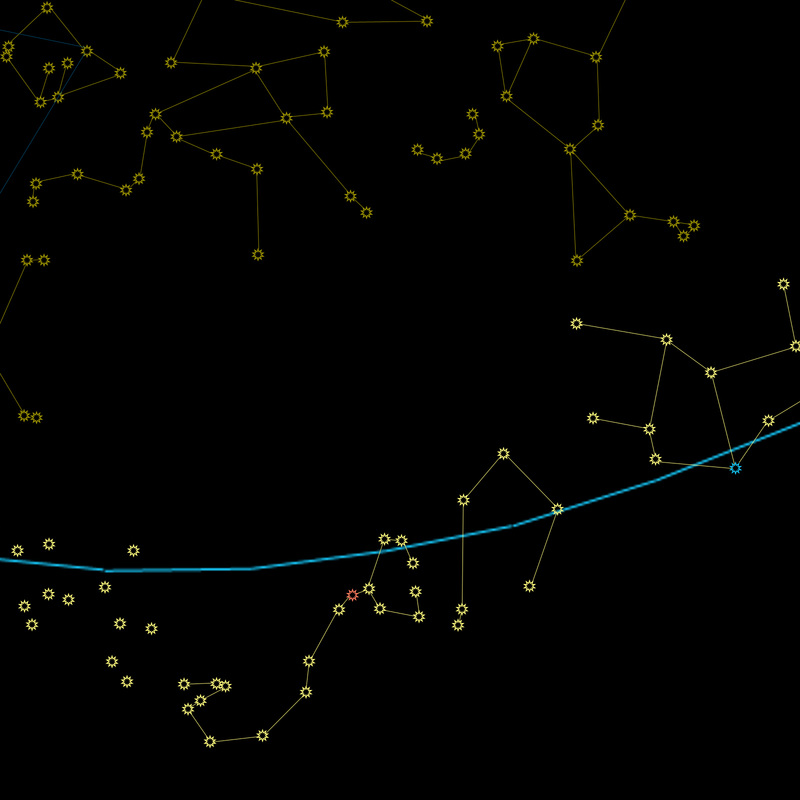 Libra, the Scales: Libra is the only non-living object represented by the Zodiac. The scales are usually depicted as those old-fashioned two-sided balances. This version is one side of the balance. Scorpius, the Scorpion: The scorpion has a red star right at its heart, called Antares (an-TAHR-ees). The Milky Way goes through Scorpius, as well as Cygnus and Cassiopeia. Follow the path from Cassiopeia, through Cygnus, and onward until you find the red star. It will be low to the horizon in the summer. 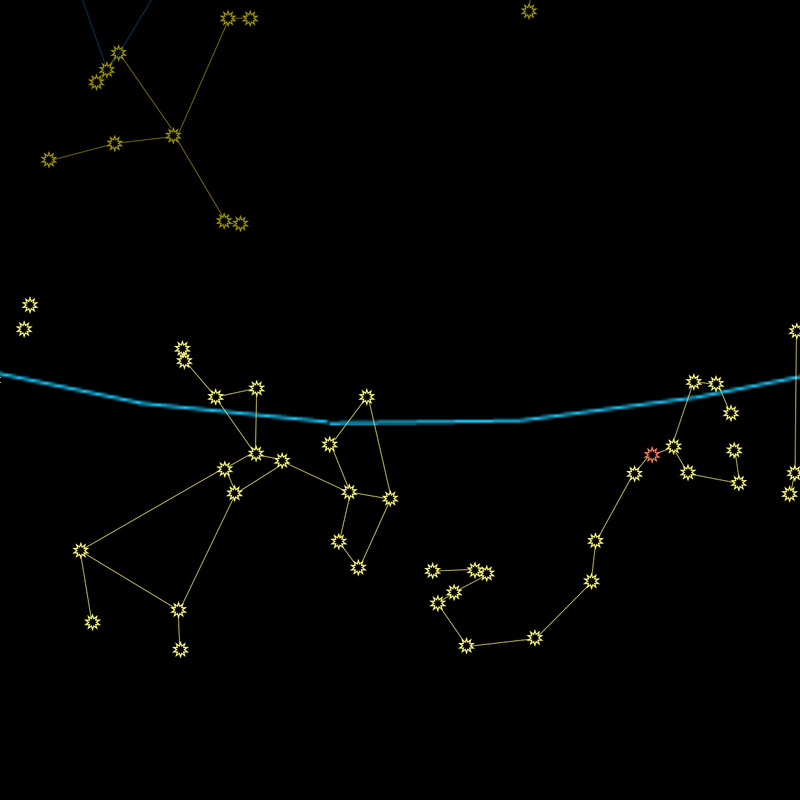 Orion and Scorpius are enemies. According to the ancient Greeks, the gods put Orion and Scorpius as far away from each other in the sky as possible. If you can see Scorpius, Orion is below the horizon in the opposite part of the sky, and vice versa. Sagittarius, the Archer: The archer shoots his bow toward Scorpius. Sagittarius also appears very low to the horizon in the northern hemisphere, so it may be difficult to see most of the time. 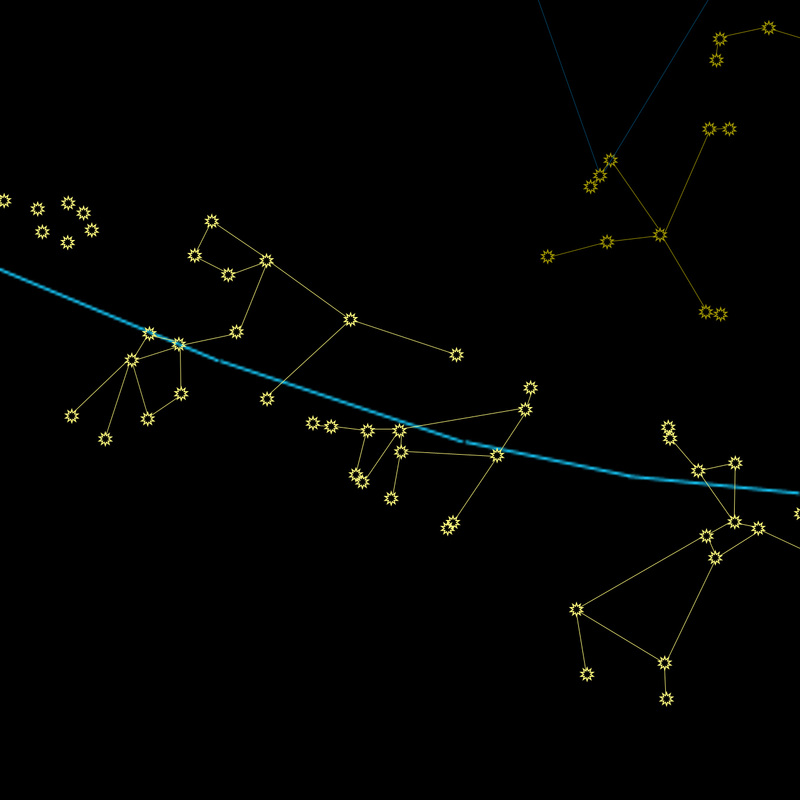 Capricorn, the Goat: In this depiction, the goat is leaning down to eat some grass near his feet, with his tail in the air, and horns pointed toward Aquarius. Following the point of the Summer Triangle through Altair may be helpful in finding Capricorn's tail. Aquarius, the Water Bearer: Aquarius is leaping over Capricorn, and water is spilling out of the bucket that he bears (see what happens when you run with a full bucket of water?) 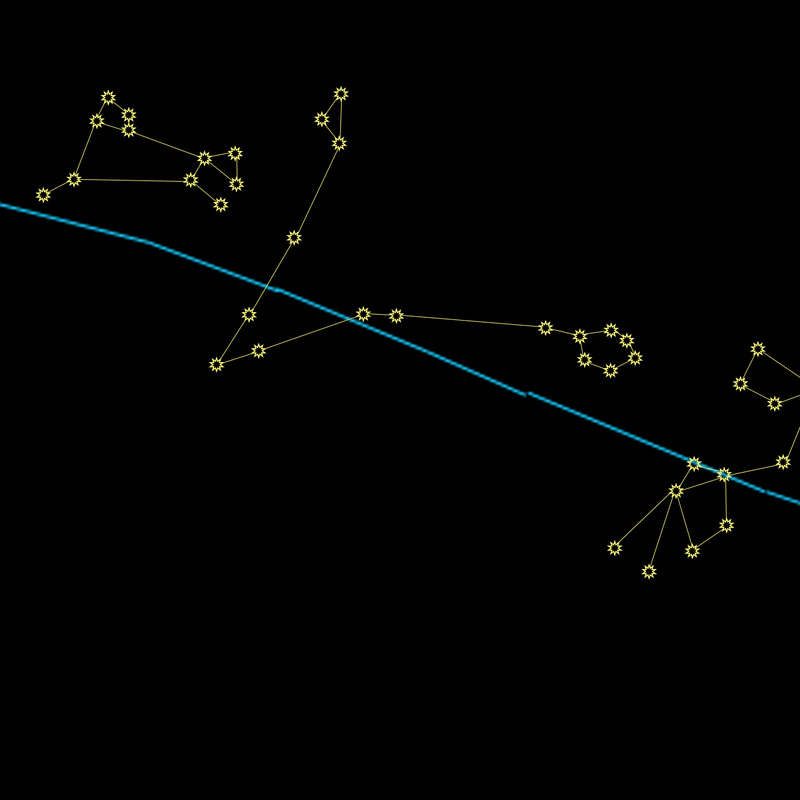 Pisces, the Fish: Pisces is two fish with their tails tied together. The "V" shape is the rope that holds them together, and the circle and triangle at the ends of the rope are the fish. Aries, the Ram: Aries leaps toward the rope in Pisces, and away from Taurus (yep, we've come all the way around again). 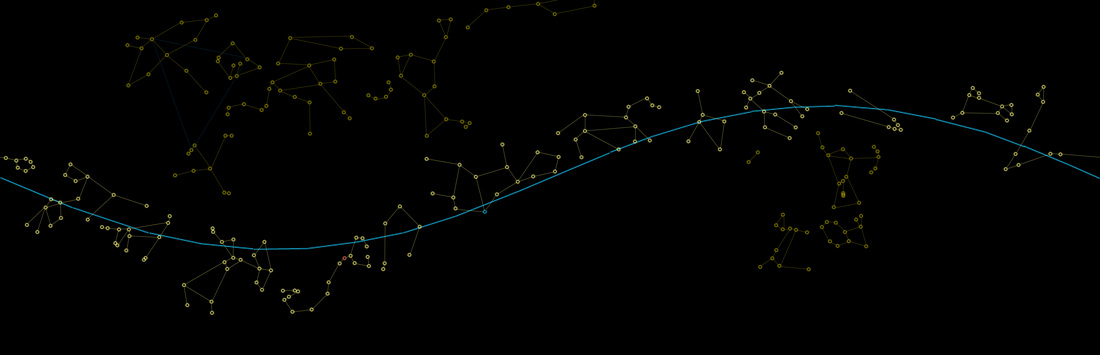 Now that you're more familiar with the Zodiac Constellations, watch the video again. Some of them are drawn using the same stars, but different lines. See if you can still identify them (try not to look at the answer in the corner) as the video progresses.  • Back to Lesson 5: Sweet Summer Sky • • On to Lesson 7: (coming soon...) • Now Available in E-Book and Paperback! If you haven't already, please start by reading Lesson 1: The North Star, Lesson 2: The Circumpolar Constellations, Lesson 3: Elegant Orion, and Lesson 4: Ask Orion for Directions before proceeding. If you've been practicing along with the real sky, you'll need to wait 6 months between Lesson 4 and Lesson 5. Sorry about that. It's summer now, for the purposes of our continuing stargazing education. Most diagrams in this lesson will show both the whole picture (so you can remember where you are), and a zoomed in version so you can see what's going on better. Start by orienting yourself. Find the Big Dipper, then Polaris, confirm Cassiopeia. I've left out Cepheus and Draco, because they're harder to find in the real sky anyway. If you want to quiz yourself a bit more, add them in where you think they should be in your mind, then check yourself by going back to Lesson 2. Boötes, the Herdsman: The Herdsman, Boötes (boo-OH-tees), contains one of my favorite stars to find. It's another red star called Arcturus (arc-TER-us). Find it using the Big Dipper; follow the arc of the handle to get to Arcturus. That red star is the brightest one you'll find in Boötes. Corona Borealis, the Northern Crown: I usually just call this one "Corona" because I've never seen Corona Australis, the Southern Crown. Find Corona by rolling an imaginary bouncy ball off the handle of the big dipper. The ball will hit Arcturus, and then bounce back up to land in Corona. Corona forms a "C" shape (C is for Corona, or C is for Crown, take your pick), and it is oriented like a cup to catch the bouncy ball. The Summer Triangle: A well-known asterism, the Summer Triangle is actually 3 bright stars from 3 different constellations. To find this one, widen your gaze a bit. The Summer Triangle is quite large. Find 3 bright stars high overhead (in the middle of the summer at prime star-watching time, it's pretty much directly above you) that form a triangle the same shape as the blue one below. For orientation purposes, notice that the skinny end points away from the line formed by connecting the Big Dipper, the Little Dipper, and Cassiopeia. Remember that in my diagrams, there are no distinctions between bright stars and faint stars. The points of the Summer Triangle in the real sky will be brighter than anything else around them; those three stars are the 2nd (Vega), 7th (Altair), and 14th (Deneb) brightest stars in our night sky. It should be fairly easy to pick them out. (Other stars in the top 15 we've already learned about: Sirius, Arcturus, Rigel, Procyon, Betelgeuse, Aldebaran, and Pollux). Cygnus, the Swan: The point of the Summer Triangle closest to Cassiopeia is the star Deneb, in the constellation Cygnus (SIG-nus). Deneb is the tail of the swan, and the swan flies toward the triangle. An asterism within the swan is the Northern Cross. The Southern Cross, visible in the southern hemisphere, "points" south the same way our Big Dipper "points" north. Lyra, the Lyre: Completing the short side of the Summer Triangle is the star Vega (VAY-guh), in the constellation Lyra (LEE-rah). A Lyre is a stringed musical instrument, kind of like a harp. Aquila, the Eagle: Completing our Summer Triangle is the star Altair (ahl-TARE), in the constellation Aquila (uh-KWIL-uh). Altair is one of the stars in the head of the eagle, and the beak of the eagle faces away from the triangle. Hercules, the Hero: Nestled between Corona and the Summer Triangle is Hercules (HUR-kyoo-leez). He holds a club above his head, and runs across the summer sky. Hercules can be tricky to discern, as he is composed of faint stars, but once you can narrow down the region of sky by finding Corona and the Summer Triangle, you might as well see if you can pick him out. 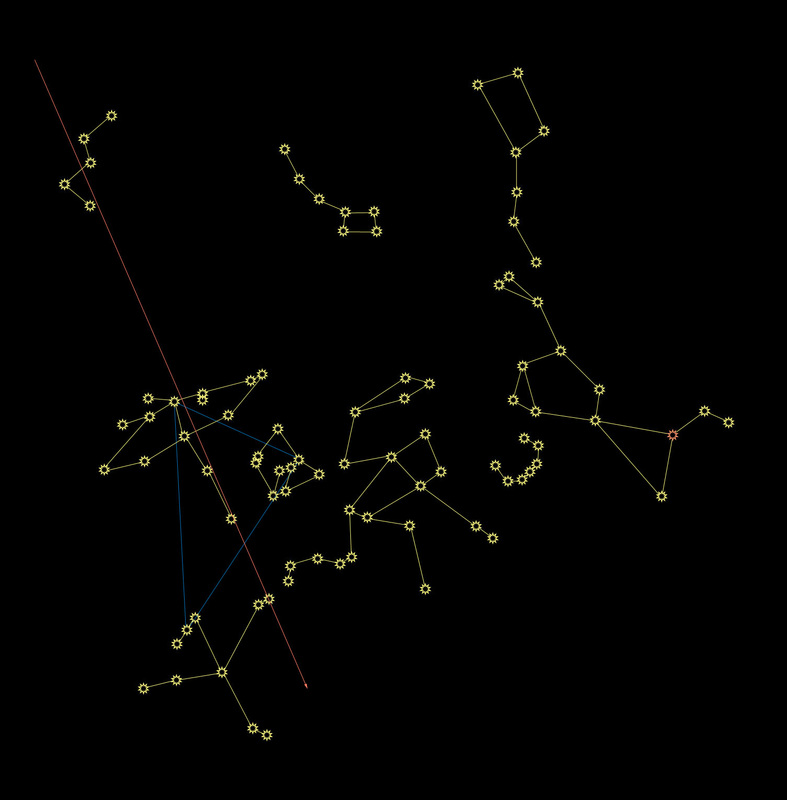 The Milky Way: If you're in a really dark area, with no moon, and far away from city lights, the Milky Way will be easy to find. Otherwise, knowing exactly where to look can help you out. The Milky Way runs through Cassiopeia and Cygnus. If you can see those two constellations, look carefully and see if you can find it. What is the Milky Way? It's our galaxy, and you're seeing it from the inside. Our galaxy is shaped like a giant frisbee in space. Imagine you are a tiny ant wandering through a frisbee factory. Suddenly, you fall into a vat of clear-blue molten plastic, and you get manufactured into a frisbee. When you look up through of the top of the frisbee, you can see a few molecules of clearish blue plastic (stars) before you see the outside world (space). If you look down through the bottom of the frisbee, you can also see a few molecules of plastic before you see the outside world. If, however, you try to look sideways through the frisbee, there's so much plastic in the way, that all you see is bluish plastic. When you see the Milky Way in the sky, it looks like a dense stripe of stars - you're looking sideways through the disk of the galaxy from inside it! The term "Milky Way" comes from the Greek word for "galaxy" (galaxy = galactic = lactic = lactose = milk, right?). With enough visible stars, the Milky Way certainly looks like someone spilled milk across the sky.  Now Available in E-Book and Paperback! If you haven't already, please start by reading Lesson 1: The North Star, Lesson 2: The Circumpolar Constellations, and Lesson 3: Elegant Orion before proceeding. 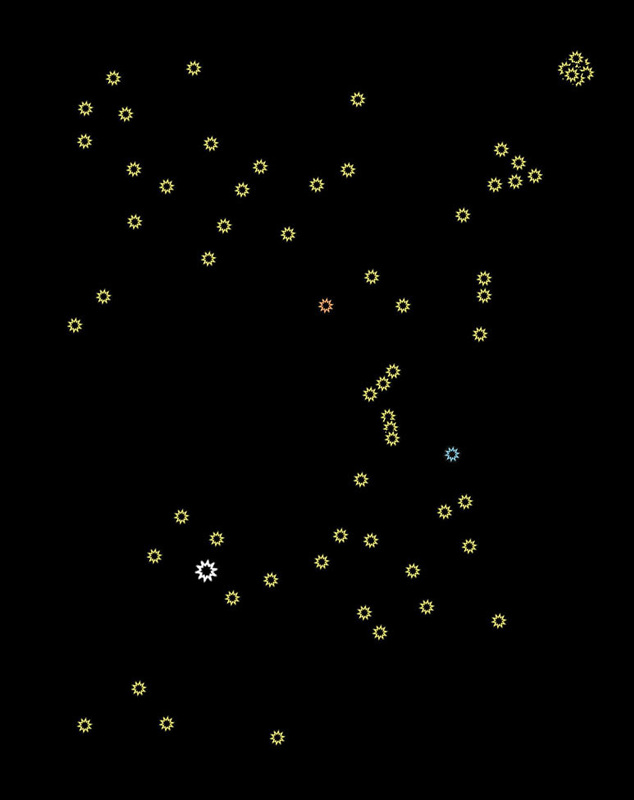 Review from previous lessons: The circumpolar constellations rotate in a tight circle around Polaris, the North Star. They are always above the horizon if you're in the northern hemisphere. Other constellations are farther away from the North Star, and rise and set like the sun. Different constellations will be visible during prime star-watching time (from early darkness to bedtime) at different times of the year. In the last lesson, we became familiar with Orion. Here he is with some of his closest neighbors. Can you spot him? Look for his belt, and then confirm by finding Rigel and Betelgeuse. 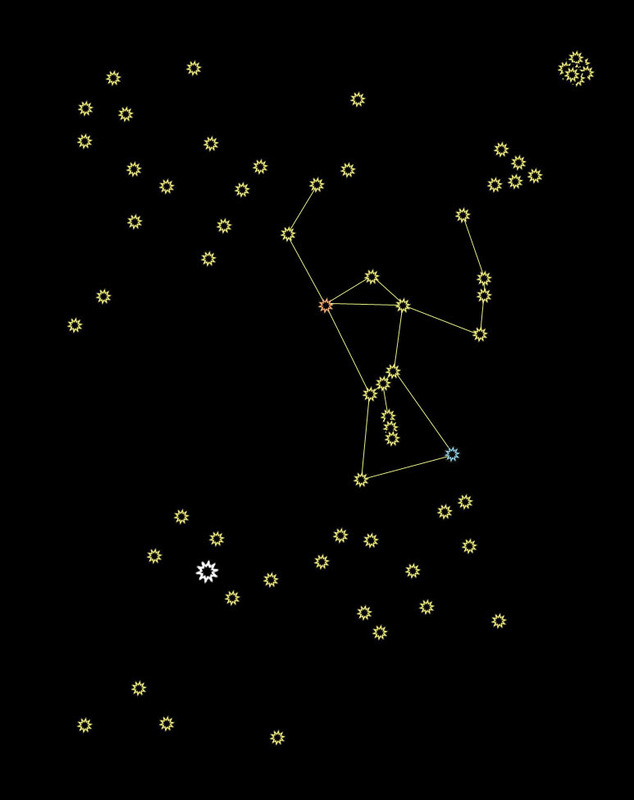 Orion, the Hunter: The stars in Orion can be used to find other nearby constellations, much the same way that the pointer stars in the Big Dipper directed us so effectively toward Polaris. We can use his belt, his shoulders, his dagger, and Rigel and Betelgeuse to find Canis Major, Canis Minor, Taurus, The Pleiades, Gemini, and Lepus. That big white star you see is the only magnitude difference I'll show, but only because it is the single brightest star.  Canis Major, the Big Dog: Follow Orion's belt down to the left. You'll come to a bright star, Sirius (it's a seriously bright star). It's so bright, in fact, that it's the brightest star you can see from Earth, other than our sun. That makes it the brightest star you can see from Earth at night. Sirius is the diamond on the collar of the big dog. It is sometimes called the "dog star." Ursa Major (the Big Dipper) is the Great Bear, and Ursa Minor (the Little Dipper) is the Little Bear. It probably follows, then, that if there is a BIG dog, there should probably be a LITTLE dog, too (the same logic follows for anything with Northern/Borealis or Southern/Australis in the title, as well). 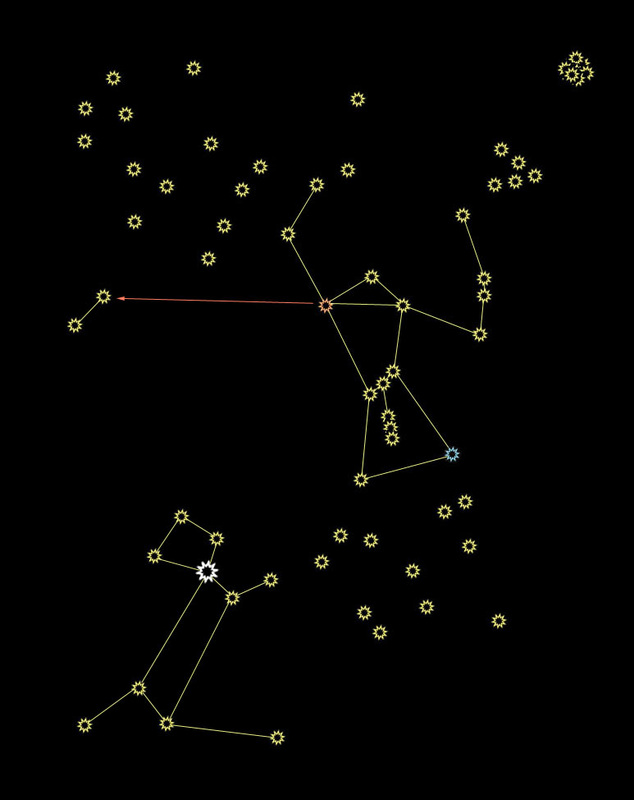 Canis Minor, the Little Dog: Follow Orion's shoulders sideways to the left, and you'll come to Canis Minor, or the Little Dog. The Little Dog is just two stars, so it looks more like a hot dog. The brighter of those two stars is called Procyon (PRO-see-ahn), which is Greek for "before the dog." This is in reference to how the stars rise. You will always see Procyon rise above the horizon before you see the "dog star," Sirius. Canis Minor is one of the 88 modern constellations, but was not recognized by the ancient Greeks. According to the Greeks, Orion had only one dog. Maybe she had puppies.  Taurus, the Bull: Follow Orion's belt up to the right, and you'll come to the nose of Taurus, the Bull. Taurus's face is a little V shape, and he has long horns reaching far behind his head. Taurus has a reddish star, Aldebaran (ahl-DEH-buh-rahn). It's the star closest to the top of Orion's shield (the star that marks the top of the bull's face and the bottom of his horn). 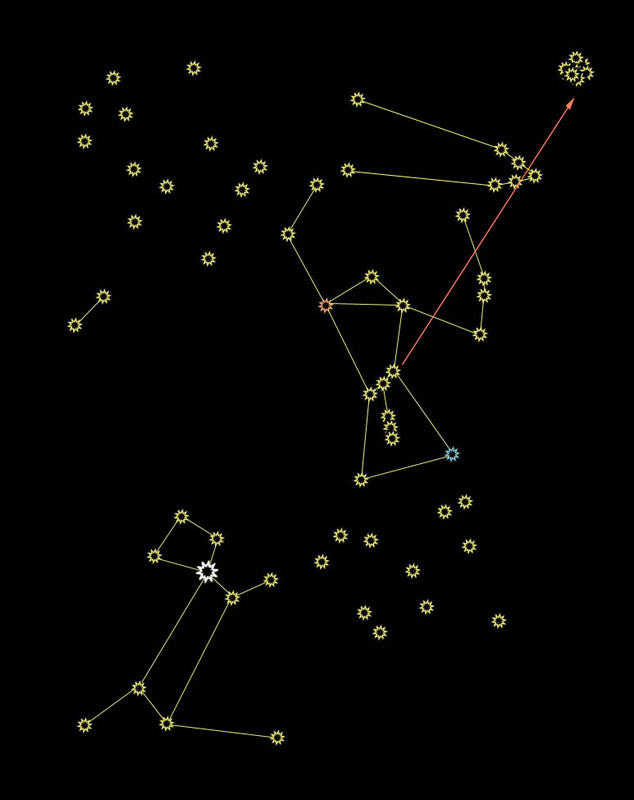 The Pleiades, or the Seven Sisters: Continue past Taurus until you reach a little blurry patch in the sky. That little blurry patch is a cluster of stars known as the Pleiades, or the Seven Sisters. In Japan, the star cluster is known as Subaru (check the car company logo next time you find yourself near a Subaru). The cluster is made up of hundreds of stars, currently passing through a dust cloud (hence the blurriness). Most constellations appear the way they do from Earth because of our perspective; if you went to another solar system, they would look completely different. The stars in The Pleiades, on the other hand, are physically near each other in space, so they will look like a cluster from any vantage point. 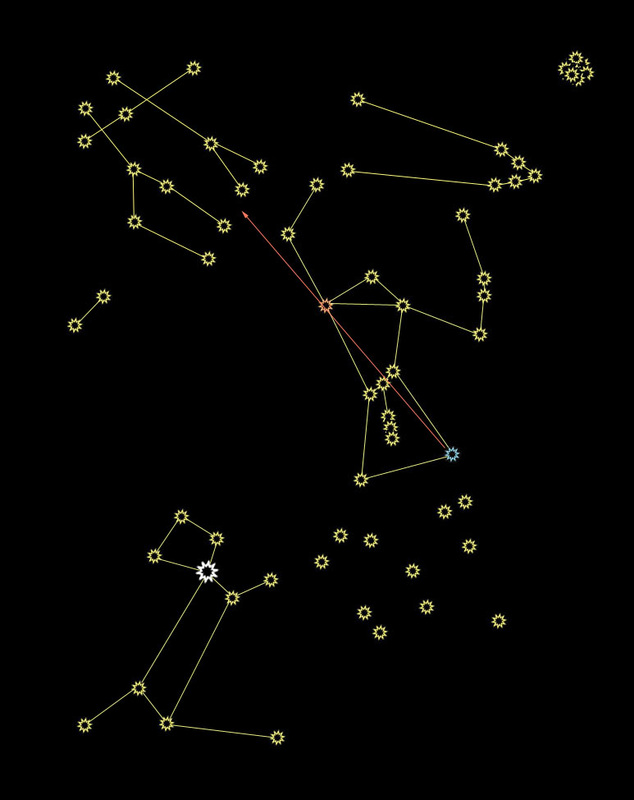 Gemini, the Twins: Draw a line from Rigel to Betelgeuse, and then continue up to Gemini. The stars that make up the heads of the twins are called Castor and Pollux. The head-stars are very bright, and will likely be one of the only recognizable parts of Gemini when you see it in the sky. Locate the twins carefully! The two head-stars look an awful lot like Canis Minor if you're only going for an approximation. Shoulders sideways gets you to the little dog, and the Rigel-Betelgeuse line gets you to the twins. Pollux has really long legs, and Castor has really short legs, so clearly they're fraternal twins. 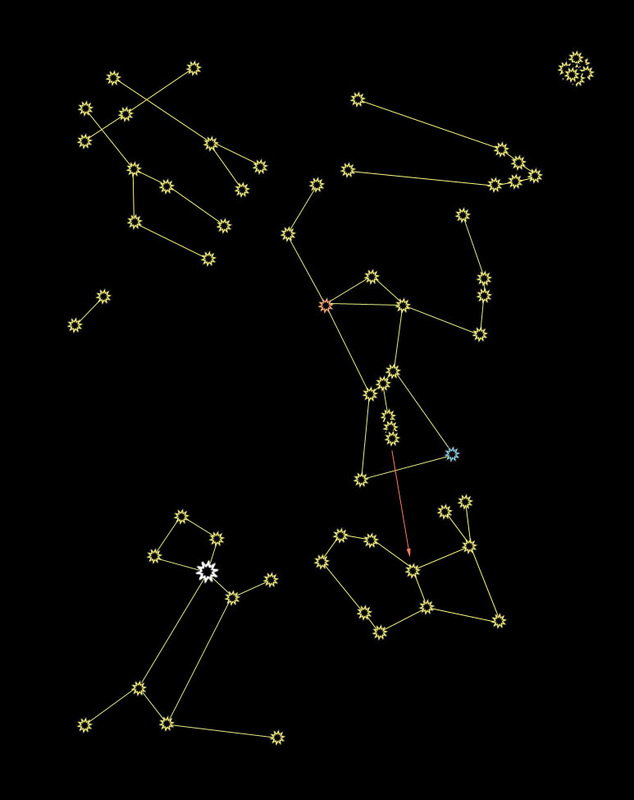 Lepus, the Hare: Shhh! I'm hunting wabbits! Orion, the hunter, needs some prey, and his dogs like to chase things. Follow his dagger downward to find a rabbit, Lepus. It's easy to remember the name of this little guy, because rabbits leap-us. Never mind that this gigantic lagomorphic monstrosity could probably take out the Little Dog with one well-placed kick of his non-existent legs... 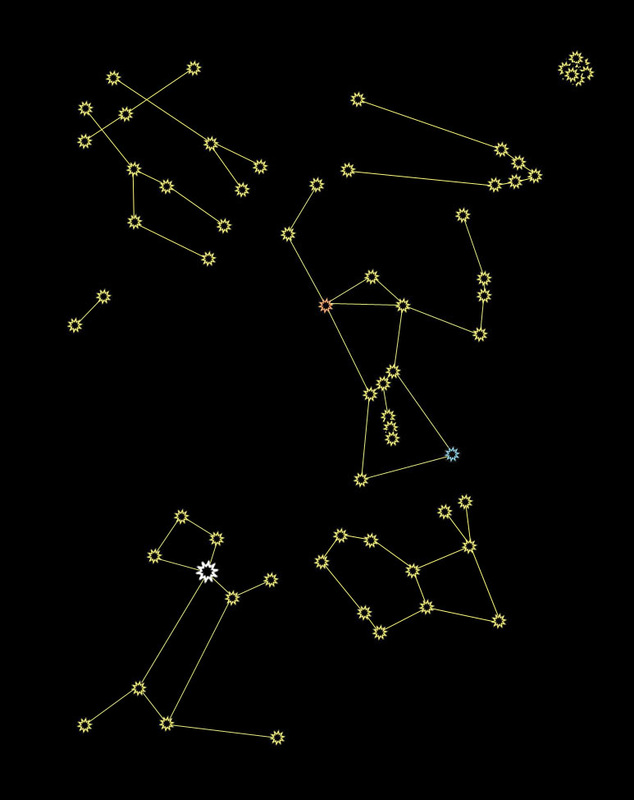 Now you know all of Orion's neighbors! If you go back to the last lesson, you can see Orion in the photograph, along with Canis Major (everything but the tip of his tail), Canis Minor, and you can even see Pollux's toes (he's the long-legged twin). Lepus is there, too, about to dive nose-first into the Pacific Ocean. You now have at your disposal two whole patches of sky, and 11 of the 88 constellations, or 12.5% (The Pleiades is considered part of Taurus in the count). That number becomes even more impressive when you think about all the southern hemisphere constellations you don't have to worry about unless you travel there.  Now Available in E-Book and Paperback! If you haven't already, please start by reading Lesson 1: The North Star and Lesson 2: The Circumpolar Constellations before proceeding. So, now you're familiar with the North Star, and all of its circumpolar friends. Other constellations are far enough away from Polaris to rise and set the same way the sun does. Star charts are arranged with times of night, hour by hour, and months of the year. That's all well and good for advanced stargazers, but that's a level of complexity unnecessary for the beginner. Let's simplify: You're most likely to be stargazing from sometime between when it gets dark enough to see all the stars until, let's say... 11:30 p.m., right? I call that "prime star-watching time." Because of the position of Earth as it orbits the sun every 365 days, different constellations will be overhead during prime star-watching time depending on the season. Constellations visible on a summer night will be "up" during the daytime in the winter, so you won't be able to see them. The Summer Triangle is a great example of an asterism you can see during the summer. I call those "summer constellations." We'll get to some of those later. For now, we're going to focus on one of my favorite fall/winter constellations, Orion. He'll be most visible during prime star-watching time from Octoberish through Februaryish. How to find Orion? Find that Big Dipper again. Now turn around, approximately 180°. You should be facing the correct general region of sky. 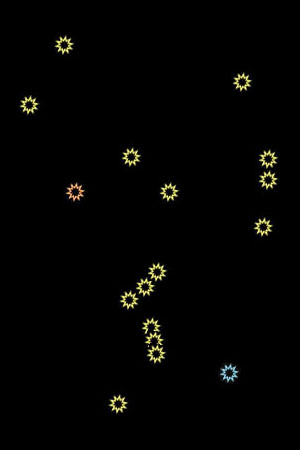 Here's my friend Orion, with just his stars. A well-known asterism (remember, that's a recognizable group of stars that aren't technically a constellation by themselves) in Orion is his belt. Those three diagonal close-together stars make up the belt, and those stars are the easiest way to find Orion in the sky. Orion has several interesting features. Notice that blue star down in the corner? That's actually a blue star. Blue stars are younger, smaller, and hotter than your average yellow star. This one is called Rigel (RYE-jell). Rigel is around 800 light years away, which means when you see that blue star, you're seeing the light that left Rigel 800 years ago. That sounds pretty far away, but in the grand scheme of the Universe, Rigel is pretty close to Earth. 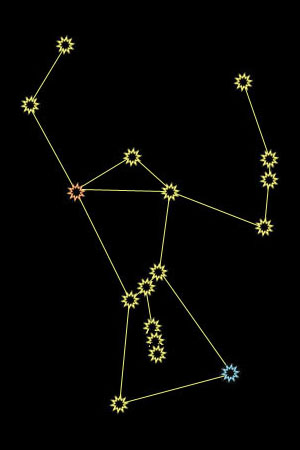 Up and to the left (the shoulder opposite Rigel), there's a red star (not RED-red, just kind of pinkish-orange). Red stars are older, larger, and cooler than yellow stars. That one is called Betelgeuse (BAY-tell-jooz, or, as almost everyone says, beetle-juice). Betelgeuse is a red supergiant. It is almost 2000 times the radius of our sun, and could fit within it over 2,000,000,000,000,000 Earths. Betelgeuse is expected to become a supernova sometime in the next million years or so. Because of its distance from Earth, it's possible that it has already done so, but the light from such an event would take hundreds of years to reach us. The dagger hanging from Orion's belt contains a nebula. The middle "star" you see is a nebula made up of dust and gasses, which will eventually condense enough to form new stars. A birthplace for stars is visible from Earth with the naked eye! 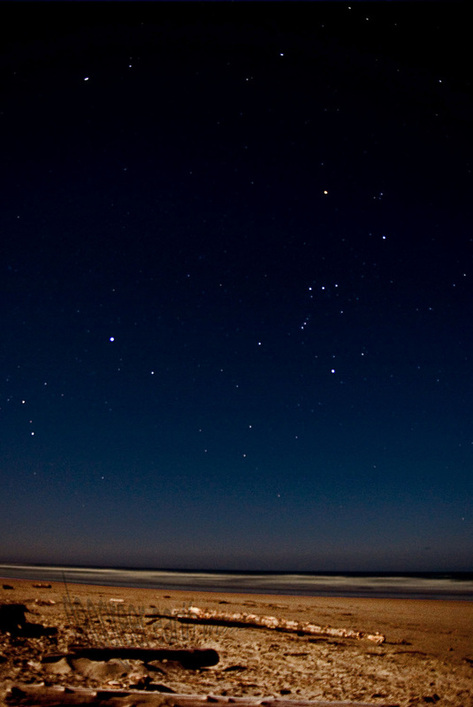 Here is an actual photograph of Orion hanging out on the Oregon Coast. Can you find his belt? It's nearly horizontal in this shot. Now find Rigel (only very slightly blue in this photo), and Betelgeuse (definitely pinkish-orange) and the dagger hanging from the belt. Orion is a hunter. He holds his shield in the arm shown on the right hand side of the diagram above, and a club or sword in the arm with Betelgeuse as the shoulder. Orion hunts with his two dogs; we'll meet them in the next lesson, but they are visible in this photograph. After you become familiar with how to find them, come back to this lesson and check the photograph again.  Now Available in E-Book and Paperback! If you haven't already, please start by reading Lesson 1: The North Star before proceeding. As we add more constellations to your repertoire, don't get discouraged if you can't remember all of them right away. Learning your way around the night sky takes patience. Take it one or two constellations at a time, and quiz yourself every time you're outside on a clear night. 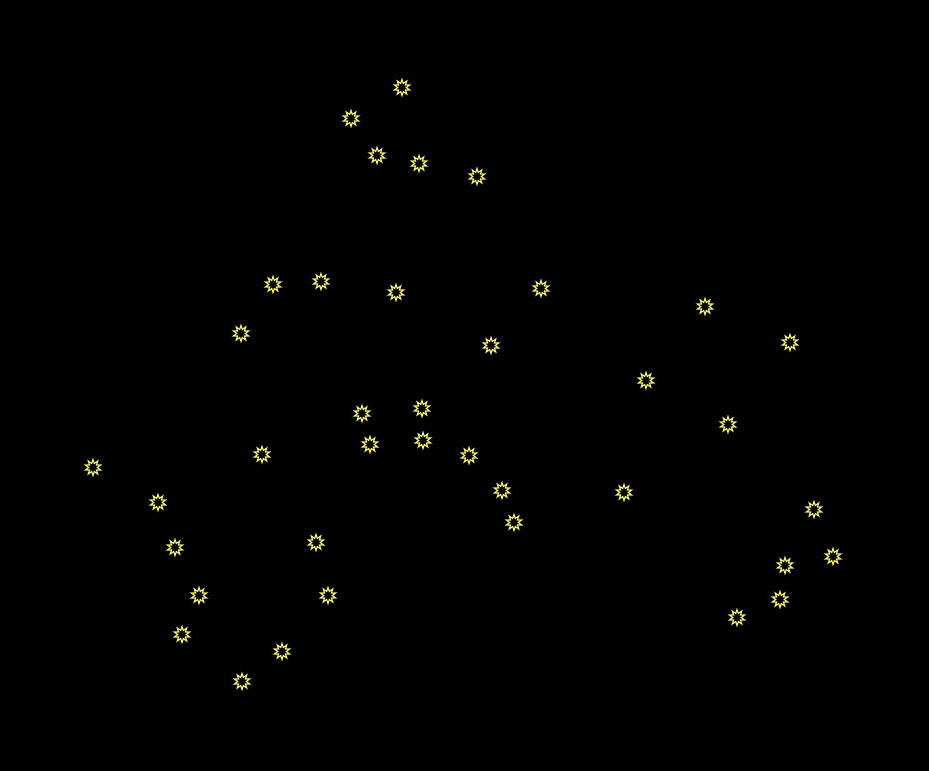 The Circumpolar Constellations: The stars closest to Polaris (the North Star) will always share that region of sky. Since Polaris will never rise or set, those nearby stars will also be above the horizon most of the time. These are good constellations to become familiar with, because they are always "up" when you want to be stargazing. Quiz from the last lesson: Can you find the Big Dipper? Can you use the pointer stars to find Polaris? How about the Little Dipper? 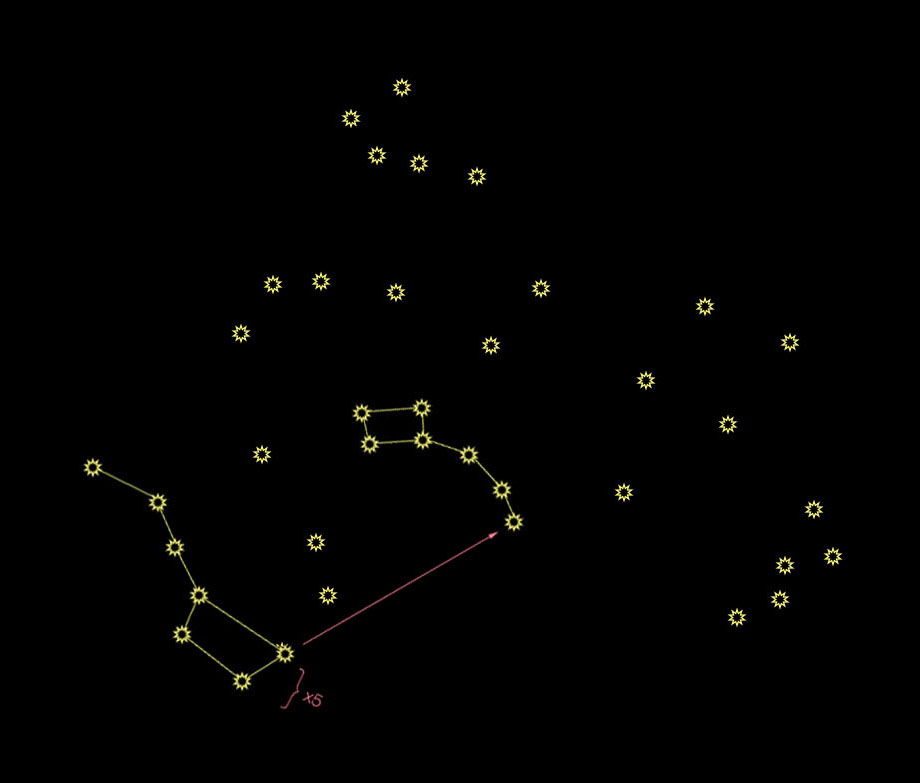 The Big and Little Dippers: OK, you remember how to find these from last time. Here they are with some distractions. Three more circumpolar constellations are shown here. We'll go through them one at a time. Remember that the stars are not all the same level of brightness, but they're shown equally here for simplicity. 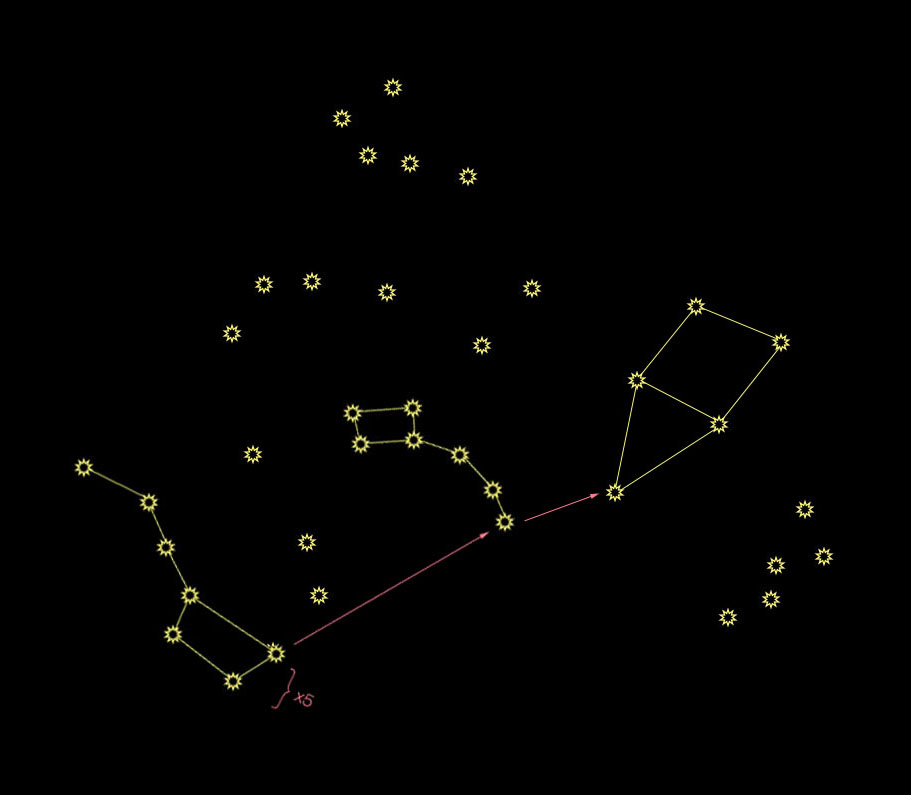 Cepheus, the King: If you use the pointer stars on the Big Dipper to find Polaris, and then keep going, you'll come to the tip of the crown of King Cepheus. The square is his head, and the triangle is his crown. He's upside-down here. Cepheus may be a bit tricky to find, as he is composed of mostly fainter stars. Look for him if you are somewhere without much light pollution and no full moon. 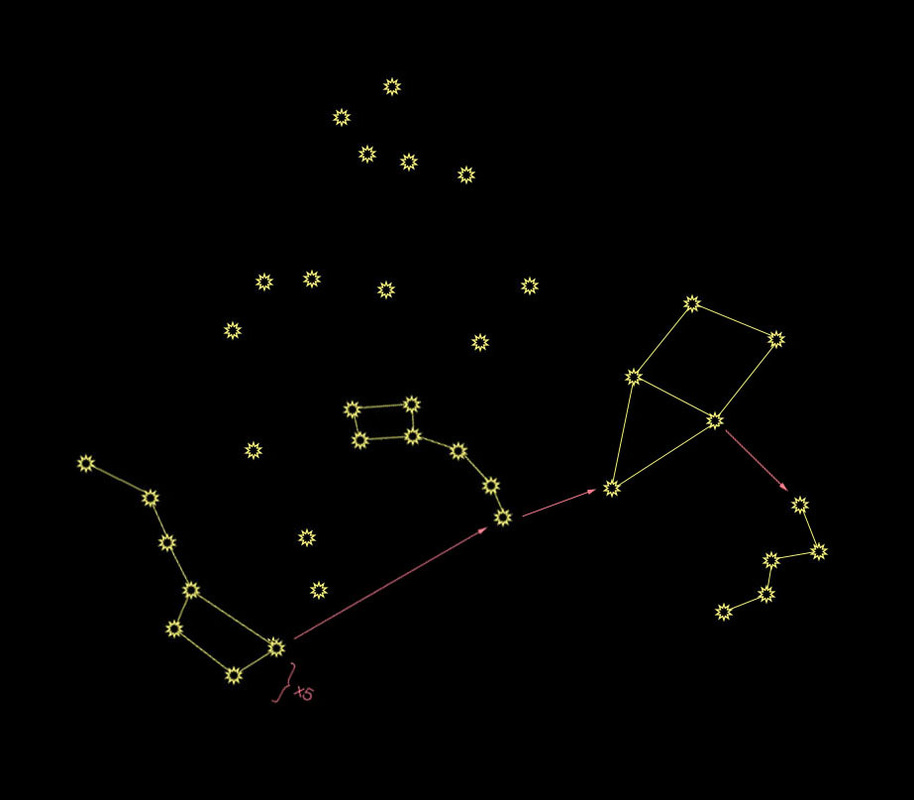 Cassiopeia, the Queen: There are two stars marking where Cepheus's crown meets his face. Cepheus always looks away from the little dipper and toward his wife, Queen Cassiopeia, so the star farther away from the Little Dipper is his eye. Follow Cepheus's gaze to Queen Cassiopeia. She's the Queen of M&Ms! OK, not really, but she looks like an "M" or a "W" in the sky. The shape represents her royal throne, in which she sits admiring herself all day. 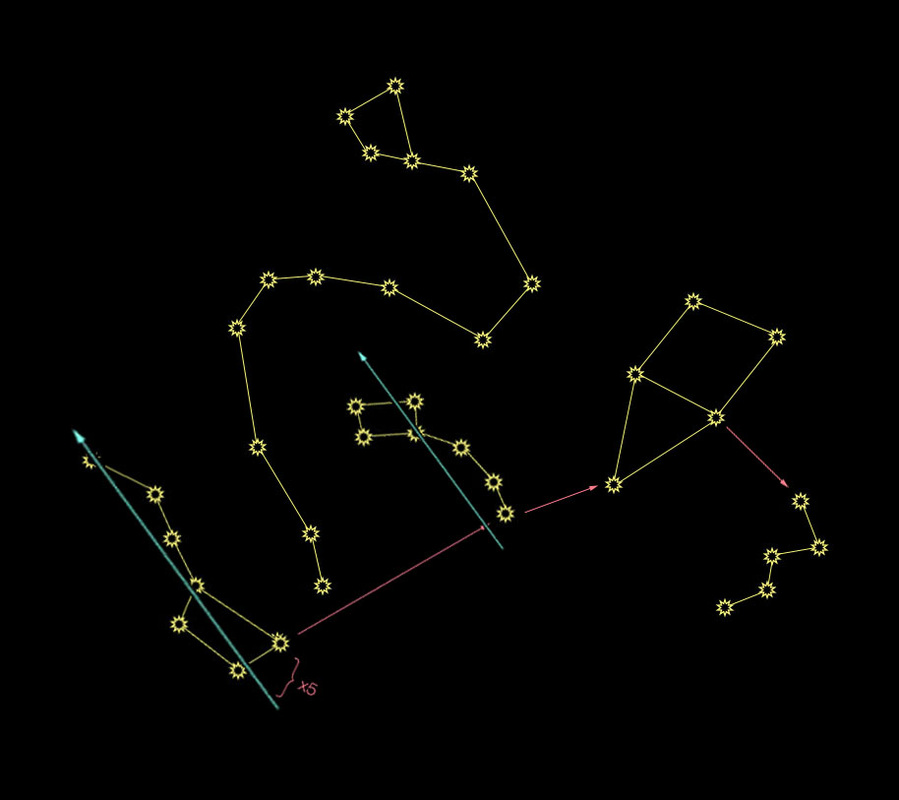 Draco, the Dragon: If you create two roughly parallel lines out of the Big Dipper and the Little Dipper, you'll see a semi-straight line of stars in between. This is the end of the tail of Draco. Follow it up, and curve around the little dipper, then snake your way up again to find the wonky trapezoid that marks his head. I like to think of Draco as the type of dragon one would find in a Chinese New Year Parade: a head followed by a long, colorful tail. Bonus Nerdy Bits: The name "Draco" has become quite recognizable as of late, from J.K. Rowling's Harry Potter series. Rowling used many names from astronomy for her characters, including Sirius, Bellatrix, Pollux, Regulus, Arcturus, Alphard, Cassiopeia, Cygnus, Andromeda, Orion (OK, so it's mostly members of the Black family...)  |
Topics
All

Archives
May 2021
|


 RSS Feed
HOME |
PHOTOGRAPHY COLLECTIONS
|

© COPYRIGHT 2020. ALL RIGHTS RESERVED.
|