|
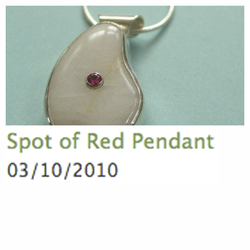
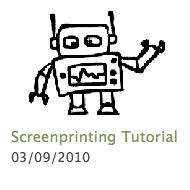
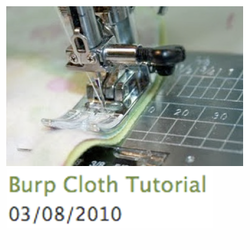
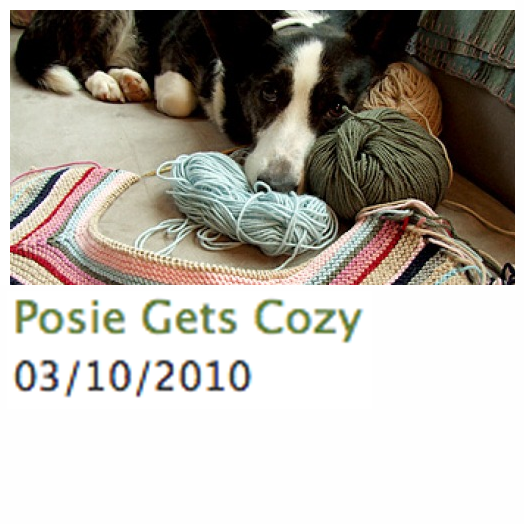
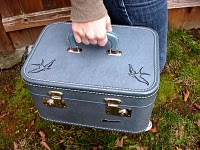
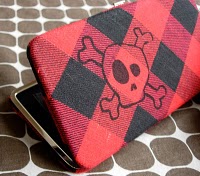
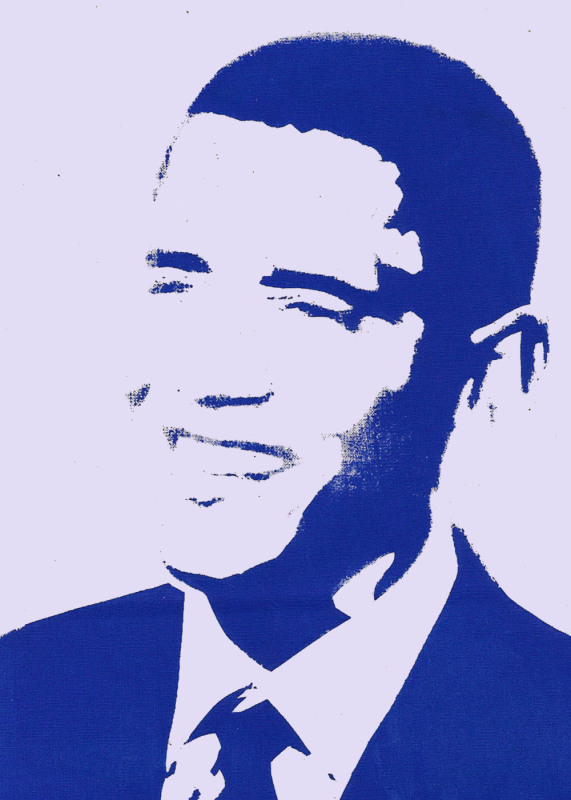
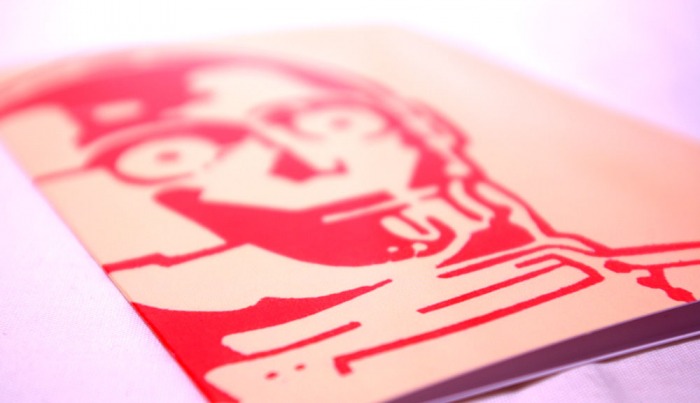
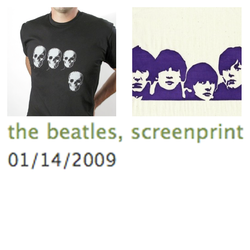
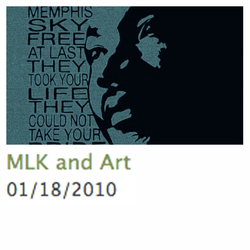
This month's craft category advertising contest had several winners; there were so many talented entrants, I just couldn't choose. Winners receive a month of free advertising on this blog. This is one of the lucky winners: Chriss Smith of The Art of Zen... Crochet loves working with natural fibers and repurposed items in her crocheted work. Chriss seeks materials that are eco-friendly or that enrich the lives of those who are disadvantaged. Chriss is currently running a giveaway (details on her blog) in honor of Earth Day, 2010. The hip and classy looking hat below was made from gently used repurposed t-shirts. Visit her Etsy Shop and Blog. 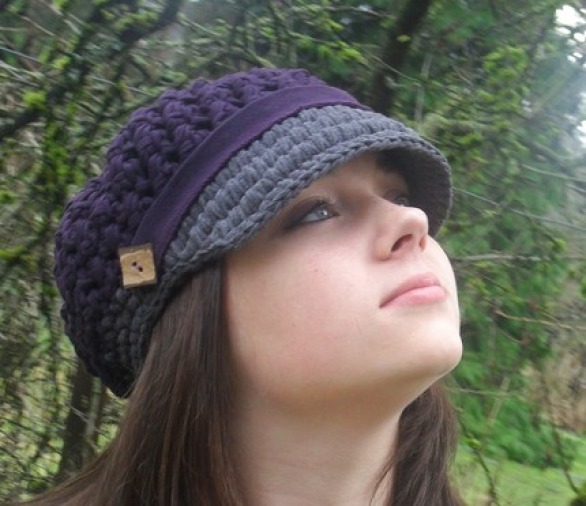  This month's Tutorial Contest had several winners. The theme was fabric, and I just couldn't choose. One of the winning entries was from Jessie of Designs By Jessie. Jessie makes a variety of brilliant creations, including fabric covers for your scratchy, uncomfortable camera strap. As one of the top entrants, Jessie has won free advertising for one month on this blog, and her original tutorial is published below. Jessie's excellent photography skills make this tutorial easy to follow. I will certainly be making a few of these for various babies I know that are soon to be born. Check out Jessie's shop and blog! Jessie's Original Tutorial: Binding my quilt was something I was really afraid to do. You have just picked up your quilt from the quilter's, they quilted this beautiful intricate design. You sweated, and bled over your quilt top. Now you have to finish it. And you might hesitate a bit, at this final stage you really don't want to muck it up! You can also pay your local quilt shop between $50 - $75 to put the binding on for you. But why bother? That is money that can go for another quilt top! 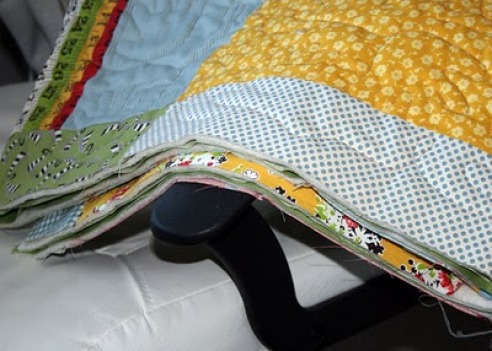 So, I have come up with a little tutorial to get you through this. Things you need: 1. Your rotary cutter 2. Your binding fabric (this could be special fabric you bought, or just scrap); I like to use the scrap fabric from my backing. 3. A walking foot 4. Quilting pins Instructions: Cut your fabric into 2 1/2 inch strips. You can cut these on the bias, but I tend to only cut my binding on the bias if I'm binding a scalloped edge. Cut enough strips that It will make it 1 1/4 way around your quilt. 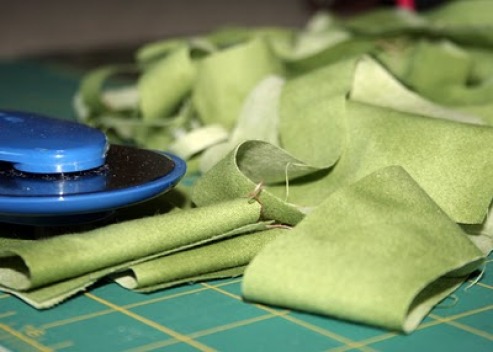 Sew the ends together so you get one continuous 2 1/2 inch strip. This strip should go around your quilt 1 1/4 times. 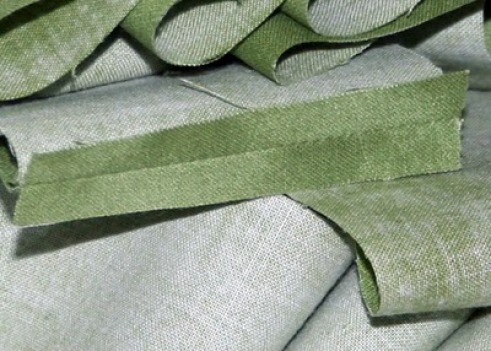 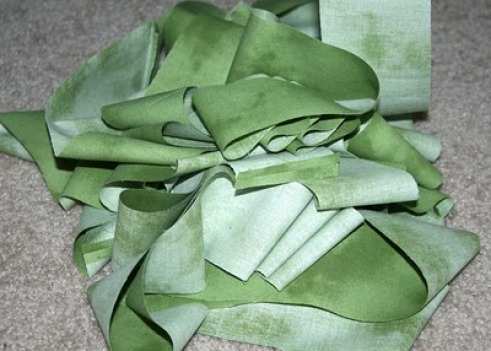 Iron your strips in half long ways. On one end, fold over the edge so it gives it a finished look. That end I will refer to as your tail end. 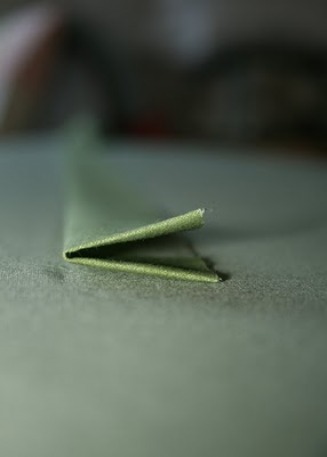 Take your binding strip. With the tail section in your hand, place it on the top of your quilt raw edge of binding facing out. Leave about 4 inches of your tail free and then pin the rest down to the quilt's corner. Sew a 1/4 inch seam to the corner of the quilt, stopping a 1/4 inch from the corner. 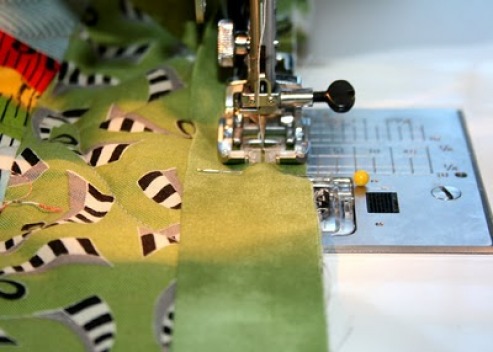 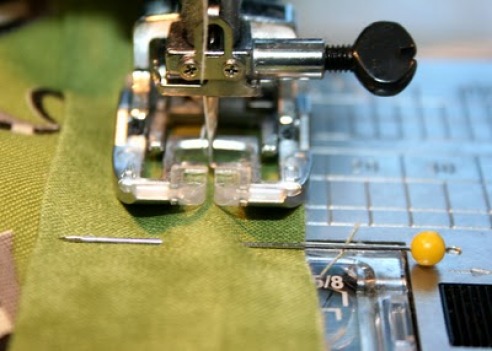 Back stitch to secure it. 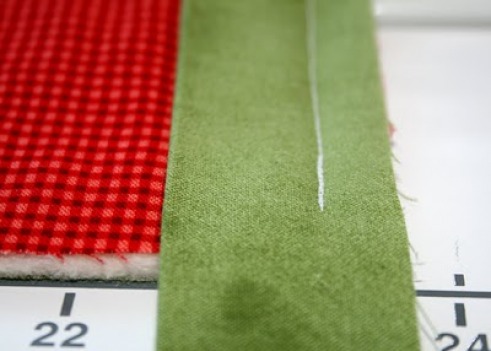 Fold your loose binding to the right, creating an L. 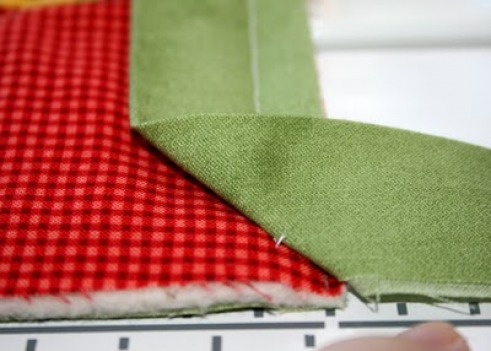 Fold the binding back over and align raw edge of binding with quilt top again and pin to secure. 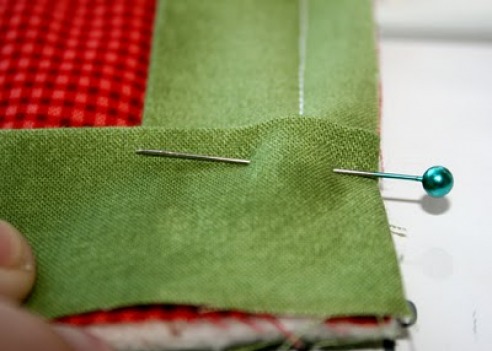 Start in the corner, and sew 1/4 inch seam to next corner and repeat for all your corners. Stop sewing once you get 6" from where you started. Once you get all around, you're going to come back to your tail section. Remember that you kept this loose? Measure your binding until it overlaps your tail section. Encase the binding strip's raw edge inside your tail section and finish sewing to your starting point. Turn the binding over the edge to the back. 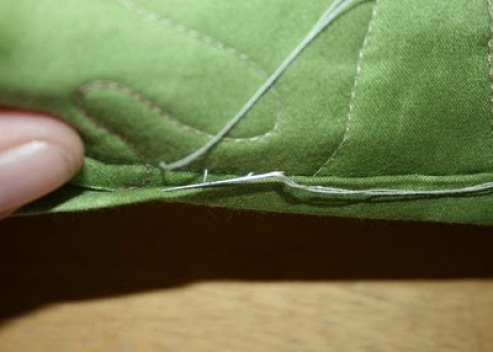 Making sure to hide the stitching lines, hand stitch around. 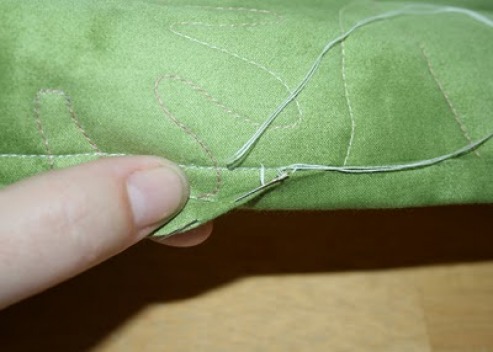 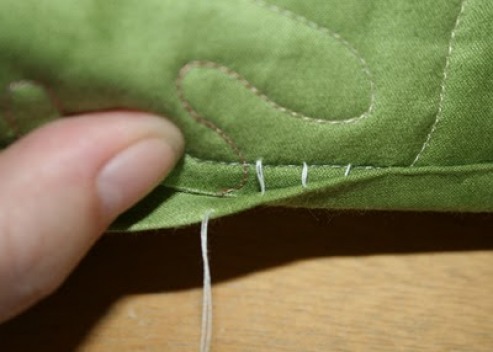 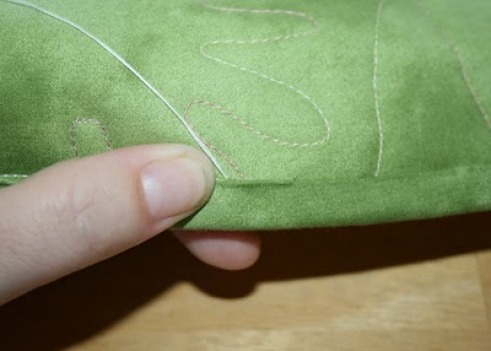 Stitch all the way around. Yes, it takes some time, and it's a bit awkward in the beginning. You will get your rhythm soon enough. Just put a fabulous movie in, or some great music and you will be finished in no time! 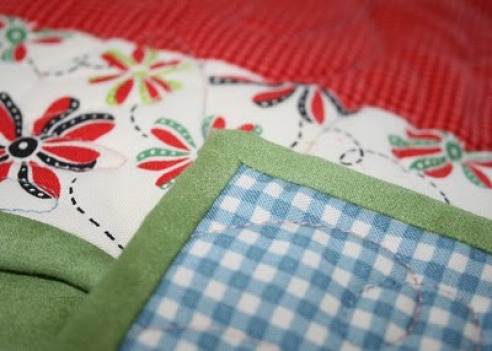 Binding with perfect mitered corners! 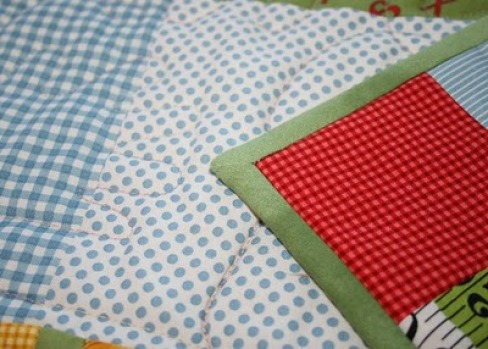 Once again, check out Jessie's Blog for the original post and other great content, and be sure to visit her shop!  This month's craft category advertising contest had several winners; there were so many talented entrants, I just couldn't choose. Winners receive a month of free advertising on this blog. This is one of the lucky winners: Lori of Lori Citsay Jewelry is a self-taught jewelry artist / metalsmith. Her beautiful designs are somehow simultaneously delicate and sturdy. This particular piece unleashes my imagination as I struggle to decide what that little rosy spot could represent. Lori has shops on Etsy and 1000 Markets. 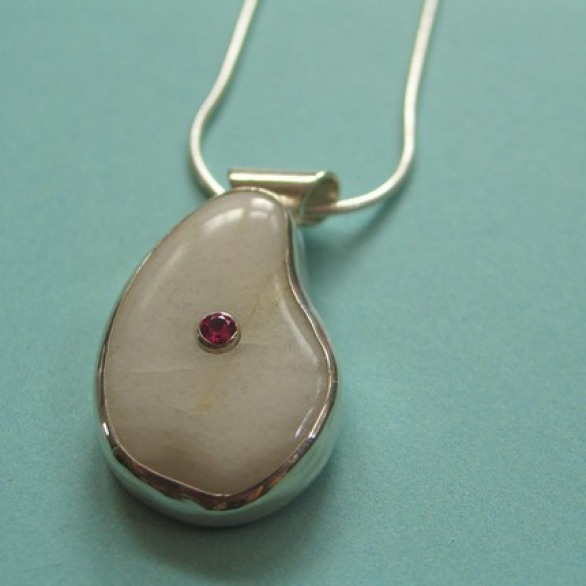  Cozy is a good way to put it. Each time I read Alicia Paulson's blog, Posie Gets Cozy, I find myself snuggled on the couch, enveloped in the fluffiest blanket in the house. Soft, cool, winter afternoon light spills across the room, and I seem to be getting something done while doing nothing at all. At least that's how it feels. Alicia has a way of harnessing a perfect afternoon, replete with just the right amount of crafty inspiration, good food, present loved ones, and relaxing pace with her brilliant writing and beautiful photography. Alicia's shop, Posie: Rosy Little Things is where you can find many of her patterns, or you can check out her book, STITCHED IN TIME: Memory-Keeping Projects to Sew and Share. An excerpt from the blog post titled: "Knitting" "In a strange way, I love knitting more than any of the other crafts I do. Its stitches have been harder won, and are somehow more precious to me. The fact that my dad might have thought it was cool is precious to me. I never do it for "work," the way I do sewing or crochet or embroidery designs; knitting is only for me, and only ever will be." (Photo below from the same post). 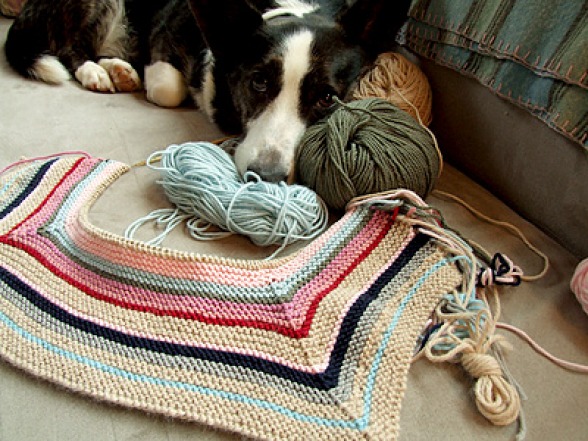  This month's Tutorial Contest had several winners. The theme was fabric, and I just couldn't choose. One of the winning entries was from Katy and Zucchini. Katy and Zucchini has an excellent collection of screen printed items with a nerdy theme. As one of the top entrants, Katy and Zucchini has won free advertising for one month on this blog, and the original tutorial is published below. I have used the exact method described by Katy and Zucchini (right down to stapling the fabric to an old frame rather than buying an official screen) and her instructions are quite complete. Check out Katy and Zucchini's shop and blog! Katy and Zucchini's Original Tutorial: Do It Yourself Screen Printing!  I have developed a cheap and dirty method of screen-printing... and I have had SOO much fun with it, I wanted to share it with anyone who is interested! I have been screen-printing for my ETSY shop Katy and Zucchini. Check it out to see some ideas of what you can do! I ordered most of my supplies from Dickblick.com. I have provided links to the items I used, but there are thousands of options out there! What you need: Pliers Picture frame (wood) Diazo photo emulsion (you can use another brand, but this tutorial uses Diazo) Diazo sensitizer (comes in a kit with the emulsion and some emulsion remover, all for about $20) Gauzy drapery (you can always find this at Value Village) Staple gun Staples Cardboard Thumbtacks Glass slightly smaller then the picture frame opening Lamp/light bulb fixture Light bulb (the more watts, the better!) Screen printing ink (I use Speedball textile ink) Timer/clock Something to print on! Some ideas: t shirts, baby clothes, umbrellas, mirrors, cards, tights, underwear, luggage, pillowcases... What would be NICE to have, but not absolutely necessary: Reflector light fixture (you can find these at a hardware store OR a pet shop...used for reptile cages) BBA BULB - 250W Squeegee Glass cutter (to use to cut the glass from your frame so it can be used to hold down your image. If you don't cut the glass, it will be too large to set inside the opening and against the screen fabric.) Screen printing fabric (I use 12XX multifillament fabric, works great!) Transparency film (you can buy these by the sheet from kinkos) Copier or printer capable of printing on transparency film Step 1: Stretching the screen. For this part, you will need: Picture fame (soft wood), gauzy fabric/screen printing fabric, staple gun and staples, pliers. • Start by removing all the hardware from the picture frame using the pliers. Remove tacks, hangers, glass, cardboard, etc.   • Once you are down to just the wood frame, you are ready to measure out your fabric.  • Cut a rectangle of fabric that is about 2-3 inches longer then your frame in each dimension. Make sure you leave plenty of fabric, as you will need to be able to grab it and pull it tight. • Lay your frame on top of the fabric so the flattest side is facing up (it is much easier to staple on a flat surface). 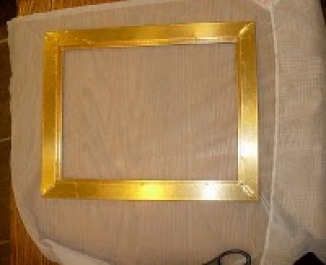 • Wrap the fabric around one edge, place a staple in the center of the side. 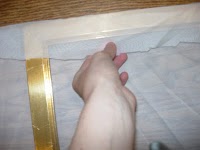 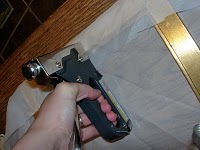 • Pull the fabric tight DIRECTLY opposite from the first staple (really tight), and place a staple. 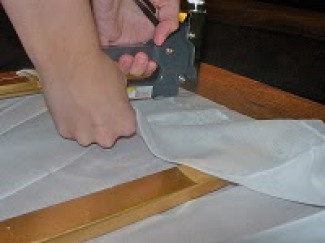 • Move to the adjacent side and repeat. • Continue adding staples in this manner all around the frame. Pull nice and tight! 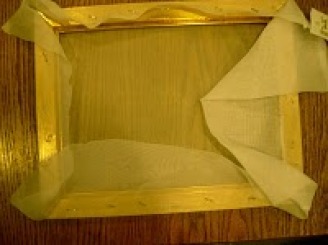 • Once the fabric seems secure and tight, trim the excess fabric.  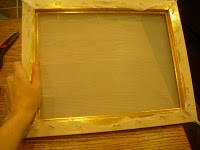 • Use a hammer to sink any staples that are sticking up. 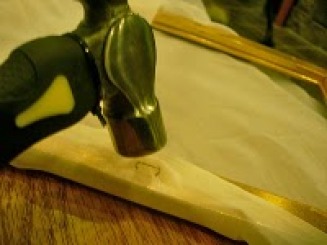 Step 2: Spreading the emulsion For this part you will need: Diazo Photo Emulsion, Diazo photo emulsion sensitizer, stretched frame (see step 1), squeegee/cardboard with a straight edge, dark space to let your screen dry, newspaper to keep your surface clean. • First, follow the instructions for mixing your photo emulsion. For Diazo photo emulsion, you will fill the sensitizer (small bottle) ½ up with cold water. Mix the water and sensitizer, then pour into the larger bottle of emulsion. Mix well. 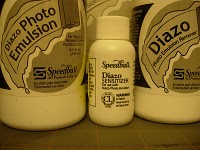 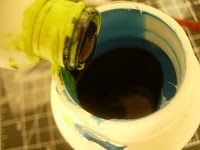 • Lay out newspaper or cardboard. This can get messy! • Keep the room dimly lit, but make sure you can see... • Place your frame on the newspaper and pour a bead of Photo Emulsion along one edge of your screen (make sure you choose an edge that is longer than your squeegee).  • Use the squeegee to spread the emulsion evenly across the surface. 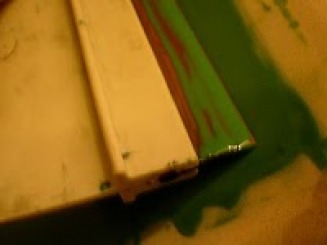 • Flip the screen over and continue to spread the emulsion. Keep spreading on each side until the emulsion looks evenly coated. If there are spots that need more emulsion, it’s ok to add more.  • Once the emulsion is evenly spread, set the frame down with the staples resting on the table. • Place a thumbtack in the four corners of the frame. This will allow you to let the screen dry without sticking to the surface. (This allows the ‘bottom’ of your screen to dry smooth and even). 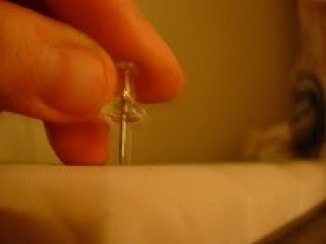 • Put the screen in a dark place (I use a cupboard, then hang a blanket over the cupboard and turn out the lights…but you could use a cardboard box, Rubbermaid container, etc. You want to keep it as dark as possible).   • Let the screen dry. This can take 24-48 hours depending on the temp/humidity. If you want to speed this up, you can use a fan. Keep the screen cool, as heat will set the emulsion! Room temperature is fine.  • Place any extra emulsion in the fridge, it will last about 4 months if you keep it cool.  • Clean up your mess! Warm water should do the trick. Step 3: Selecting your image/design For this tutorial I will explain how to print any image from your computer to burn onto your screen, however you can draw your own design on transparent plastic/glass for a simpler process. You could also cut a design out of opaque paper and use that! For this step you will need: Transparency film, printer, image on your computer • Select your image . The image you select must be black and white only (not gray scale). Don’t worry, you won’t have to print with only black ink, but the purpose of the transparency and printed image is to block light from reaching your screen.  • Print your image on paper to make sure it is the size you want it (it should be small enough to fit inside the frame with about an inch of space on each side). • Load the transparency paper into your printer and print two copies of your image (if it will fit, print two on one page, you can cut it in the next step).  • Once you have two copies, you will overlap the two to make your image opaque (you don’t want any light to pass through). Use clear tape to keep them overlapped. 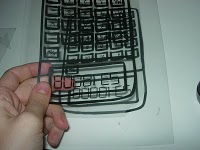 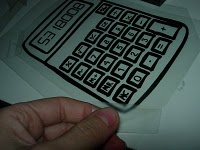 • Cut the transparency film so it will fit into your frame. Step 4: Exposing your screen For this part, you will need: Light fixture and light bulb (using a reflector fixture and a BBA BULB - 250W will significantly cut down the time needed to expose your screen!), your image (see step 3), timer/clock, glass piece large enough to cover your image (but small enough to fit inside the opening in the frame). • Place black cardboard on your work surface. You don’t want light reflecting off the surface and exposing your screen. • Keep the room dimly lit. • Hang your light approximately 12 inches from the work surface. • Lay out your image and the glass piece, get them ready to place on your screen. • Get out your screen (make sure the emulsion is dry by touching the surface in one of the corners). Remove the thumb tacks. • Place your screen on the black paper, directly under the light. The frame should be placed with staples facing up, the fabric in direct contact with the black paper. • Quickly place your image on the screen, center it and be sure it is straight. (Although the room is dark, make sure you can see well enough to check that your image isn’t reversed…) Place a square of glass on your image to hold in in direct contact with the fabric. If you don't have a piece of glass small enough to fit inside the frame, you can tape your image down. 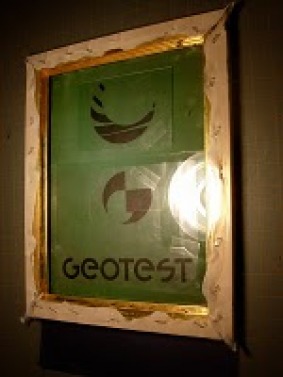 • Use this chart (http://www.reuels.com/reuels/Silk_Screen_Printing_Instructions.html) to determine your exposure time. SPEEDBALL SCREEN PRINTING SYSTEM Recommended Exposure Chart (Revised 1/77) 150 Watt Bulb, Clear Incandescent Screen Size . 150W Bulb Height . . . . . Exposure Time 8"x10" . . . . . . 12 inches . . . . . . . . . . . . 45 minutes 10"x14" . . . . . 12 inches . . . . . . . . . . . . 45 minutes 12"x18" . . . . . 15 inches . . . . . . . . . 1 hr. 14 minutes 16"x20 . . . . . . 17 inches . . . . . . . . . 1 hr. 32 minutes 18"x20" . . . . . 17 inches . . . . . . . . . 1 hr. 32 minutes BBA No. 1 Photoflood (250 Watt) Screen Size . . Lamp Height . . Exposure Time 8" x 10". . . . . . 12 inches . . . . . 10 minutes 10"x14". . . . . . 12 inches . . . . . 10 minutes 12 "x 18" . . . . .15 inches . . . . . 16 minutes 16"x2O" . . . . . 17 inches . . . . . 20 minutes 18"x2O" . . . . . 17 inches . . . . . 20 minutes PLEASE NOTE: This chart has been prepared using an aluminum foil pie-plate reflector. More sophisticated light sources, reflectors and equipment can, of course, be used. However, as any variable is changed, you will have to adjust the exposure times and distances. This will require experimentation. • Turn on the light for the amount of time indicated on the chart. I use a reflector fixture 12 inches from the surface, with an XX light bulb, and I expose an 8X10 inch frame for 4 minutes. I messed around a bit with exposure times, and found it work the best for me. You might have to experiment a little. Too much exposure can set ALL the emulsion, and no ink will be able to pass through. Too little exposure might not set the emulsion well, and all of it will wash off.   • After exposing the screen, immediately take the screen to a sink/tub/hose. The more spraying pressure, the better! Try to keep the screen from being exposed to too much light during this process. I turn out the lights in the bathroom and use the hall lights to help me see. • Rinse the screen with room temperature water. DO NOT USE HOT WATER! Remember that heat will also set your emulsion! You can use your finger to lightly scrub where you want the emulsion to wash out. • It might take several minutes to see your image start to appear, but don’t lose hope. The more pressure you can spray on the screen, the faster the unset emulsion will rinse out. I have a 'water pick' in my shower, and it sprays a super strong stream. Works great! 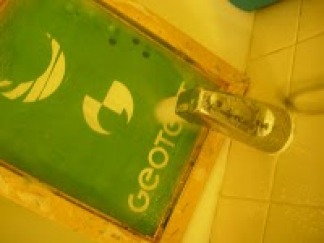 • Once it seem like your image is ‘clean’ (meaning the emulsion has rinsed out), hold your screen up to the light to be sure you didn’t miss any spots. • Let your screen dry completely. Step 5: Making your print(s) For this part you will need: ink (use fabric/textile ink if you are printing on clothing), squeegee or a piece of cardboard with a flat edge, something to print on, your screen (see step 4), cardboard. • Test your screen on a piece of paper first (I will describe how to print on a t-shirt, but you can print on just about anything!) • Lay your shirt out flat.. Place a piece of cardboard inside the shirt directly under where you will print your image.  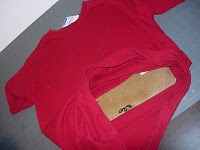 • Place your screen on your t-shirt. Align the image to where you want your print. I use the transparency image to get a good idea of what it will look like...  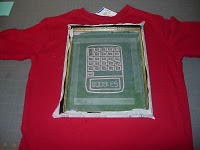 • Use a piece of cardboard to scoop out some ink and spread a bead along one edge of the screen. 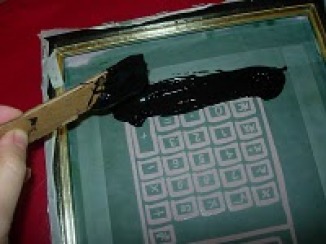 • Use one hand to hold the screen steady. It might help to have an assistant hold the screen on your t-shirt for your first few times. • Use the other hand to draw the squeegee over the bead of ink and all the way to the other end of the screen. You will use quite a bit of pressure while squeegeeing…this takes some practice. Try to use even pressure the whole time. 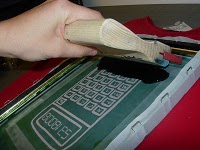 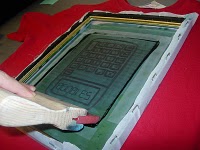 • Carefully lift the screen from your t-shirt. Let the ink dry (follow any directions given to 'heat set' the ink to your fabric. Speedball requires you to iron the image to heat set it, so it is machine washable). 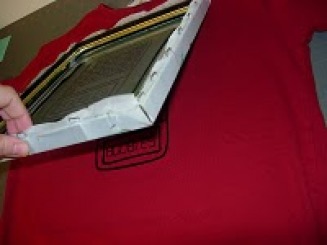 • You have your print! Do it again on another shirt, or card, or scarf, or your wall…you just might get carried away. I know I did! 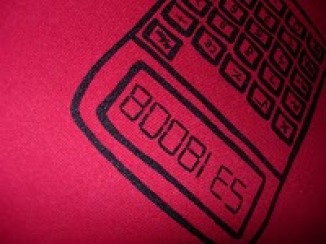 • Be sure to rinse your screen with warm water after you are finished. Let your screen dry flat. It can be reused MANY times! Or…you can use diazo photo emulsion remover to remove all the emulsion, and start over again at step 2! Here are some ideas for some things you can print on! The sky is the limit! Additional tips from Daogreer Earth Works: You can create simpler designs by printing them on card stock and cutting them out with an X-acto knife. Any solid object is the simplest, but with practice you can create stencils as complex as the MLK design below. Lay out your shirt with the cardboard inside. Place your stencil on top of the shirt, and then place a blank screen on top of that. Make sure any exposed edges are covered with newspaper. Now follow the rest of the directions in step 5. Card stock stencils can be used 3 or 4 times before they disintegrate. Be sure to peel all remnants of the card stock off the screen and thoroughly rinse the screen immediately after use so it can be used again. Below are some designs by Daogreer Earth Works, screen printed using stencils cut out of card stock. Some were then scanned and altered for printing purposes. • Taxus Brevifolia - Pacific Yew Tree, reverse shows a molecule of taxol, the cancer-fighting agent found in the Pacific Yew Tree, available as a canvas tote. • Blue State of Mind - Barack Obama, screenprint came out as slightly "overexposed," available as greeting card, postcard, art print, and ACEO. • Golden Boy - C3PO, available as greeting card, postcard, art print, and ACEO. • I've Wondered - Wonder Woman, available as postcard in six colors and ACEO. • All the Lonely Purple - The Beatles, available as greeting card, postcard, art print, ACEO, and muslin screenprint. • MLK - Martin Luther King Jr. with excerpt from U2's song Pride (in the Name of Love), available as t-shirt (one left!) and postcard.  This month's Tutorial Contest had several winners. The theme was fabric, and I just couldn't choose. One of the winning entries was from Jessie of Designs By Jessie. Jessie makes a variety of brilliant creations, including fabric covers for your scratchy, uncomfortable camera strap. (Jessie's camera straps are now limited edition - when they're gone, they're gone!) As one of the top entrants, Jessie has won free advertising for one month on this blog, and her original tutorial is published below. Jessie's excellent photography skills make this tutorial easy to follow. I will certainly be making a few of these for various babies I know that are soon to be born. Check out Jessie's shop and blog! Jessie's Original Tutorial: As promised I put together a little tutorial for the burp cloths I made last week. They were dead simple, and seriously... I think It took me longer to buy the flannel. If I was smarter and better prepared I would have bought it online. There is a much larger selection online then in any of the stores I went to. The mom to be, her baby colors were pink and green, so I really wanted to stick to those colors. 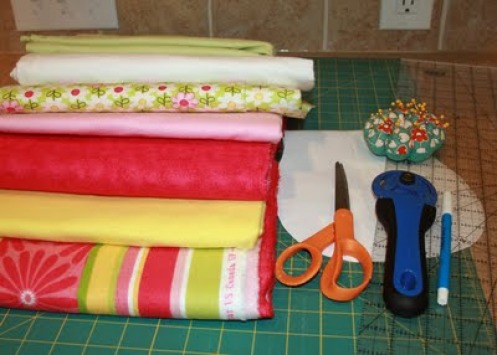 What you need: 1/2 yard of each color (which ever colors you choose) I bought 1/2 yard of the solids, and 1 1/2 yards of the Prints, and 3 yards of the white and hot pink. Remember I also made a blanket so you only need about a half a yard. Free online pattern that you can find Here. Cutting Mat Rotary Cutter Pins Fabric Scissors Fabric Pen Ruler Sewing stick pins. Directions: Print out your pattern, tape it together, and measure it. This one is a little bit more than 8 inches wide. I also noticed that I could fit two of these patterns on the fabric if I measured selvage edge to selvage edge 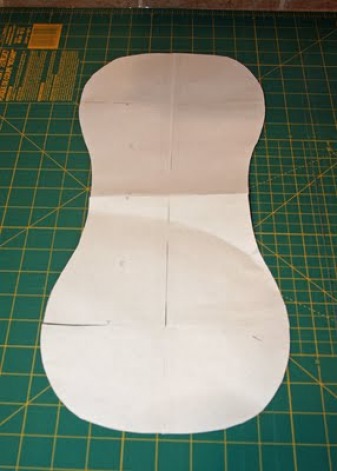 Carefully measure out your 9 inches. 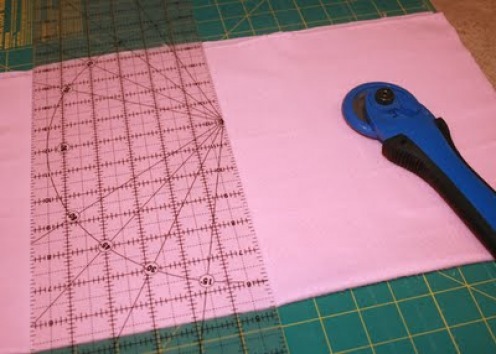 Make your cut. 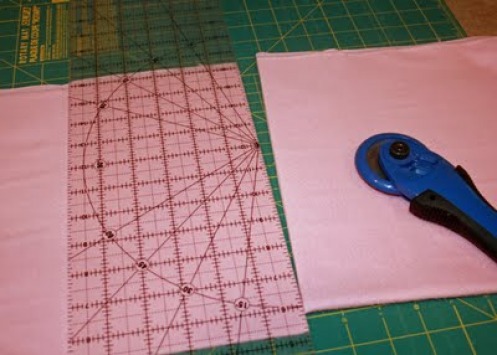 Place your pattern on the flannel with the wrong sides facing out. If you left your fabric in half like I did, you will have the right sides already facing each other in the middle. 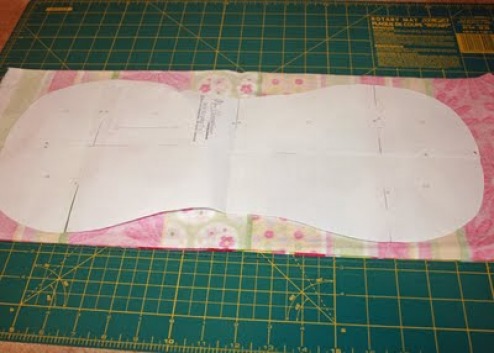 With your fabric marker, trace your pattern. 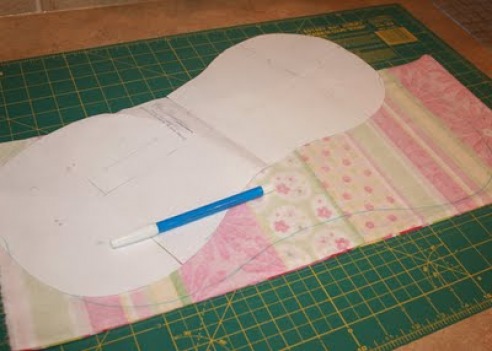 With Scissors, cut out the shape. As you are working with your fabric doubled up, take care to cut them carefully keeping the fabric together. It doesn't have to be perfect, but it also shouldn't be way off. 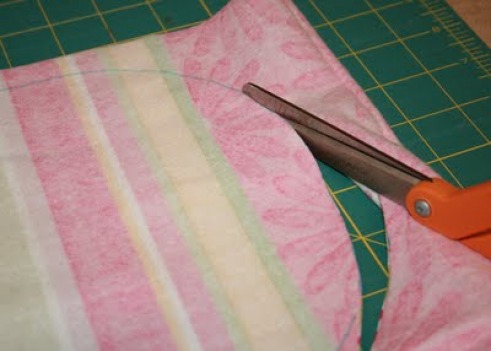 See. .. you have cut 2 at the same time! 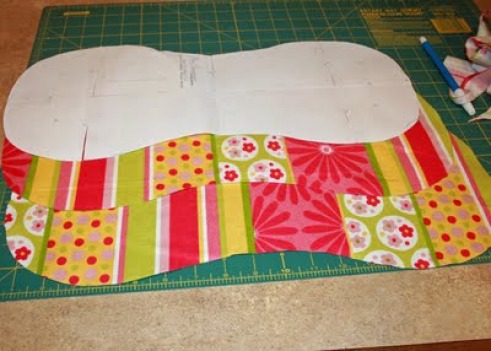 Here is a better look at what it looks like after tracing. At that point I then traced all my fabric to get it out of the way. 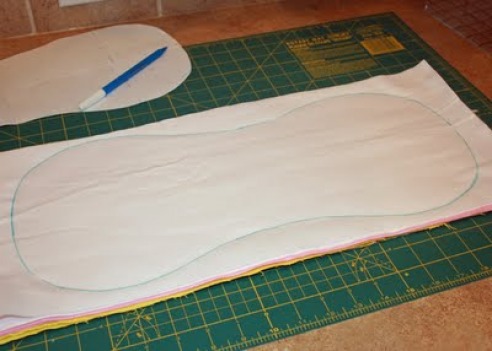 See? All cut out. Now comes the fun.. 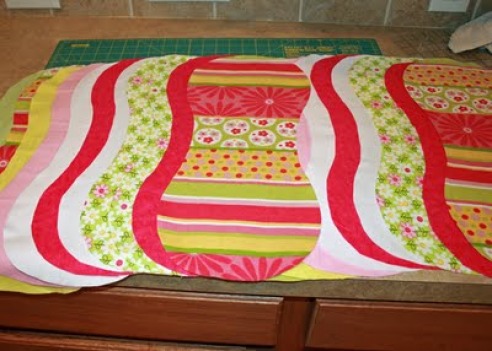 If you are using a mix of fabrics, start matching them up. Right Sides together. 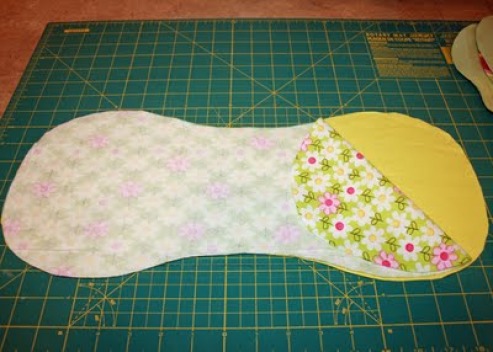 Pin around your edges. 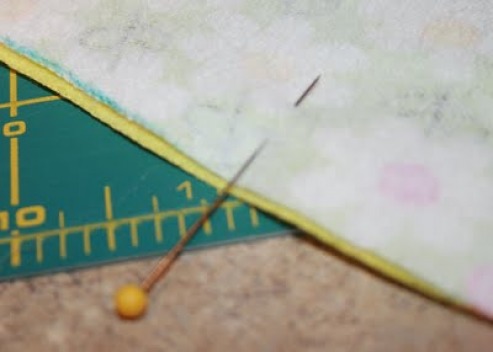 Then start to sew. I used a 1/2 inch seam allowance. Sew 90% around making sure to leave an opening about 2 inches.*TIP* After several of these were finished, I found it was much easier to leave the opening in the center where it curves in. Instead of at the bottom. 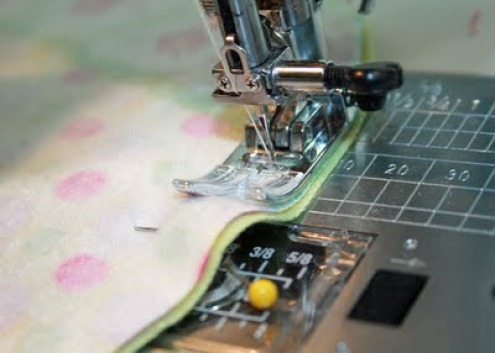 Find your opening and push it right side out. Shape it out. 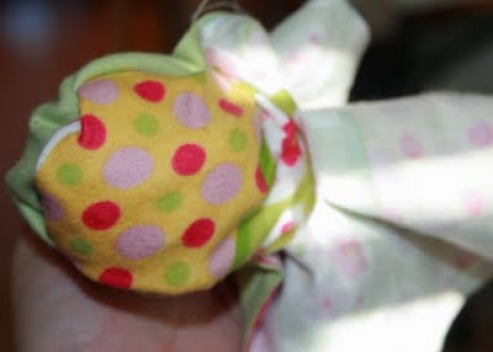 Iron it flat to set your seams. Careful to push the fabric all the way out to maintain the shape. 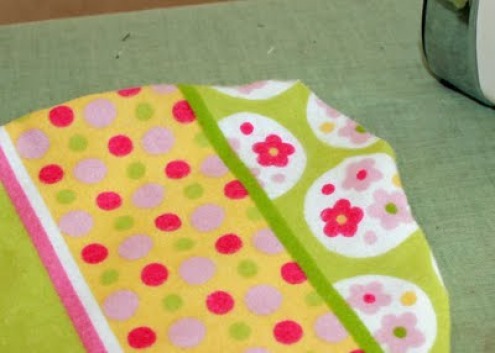 Carefully finger tuck the opening following the earlier seam allowance then Iron down to set. 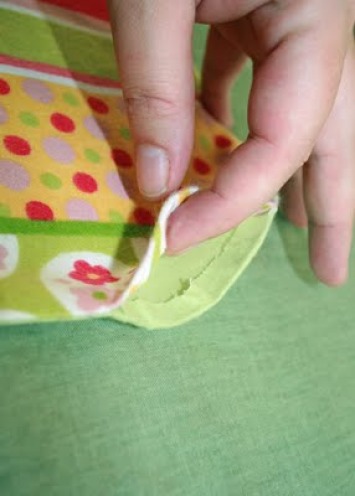 Top stitch around the whole thing. I used a 1/4 inch seam allowance, to make sure I was sewing over the selvage on the inside. It gives it stability on the edges to help maintain its shape after multiple washings. 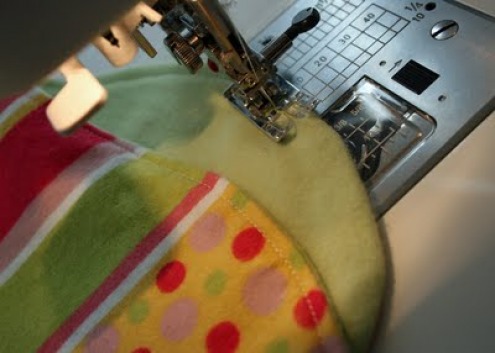 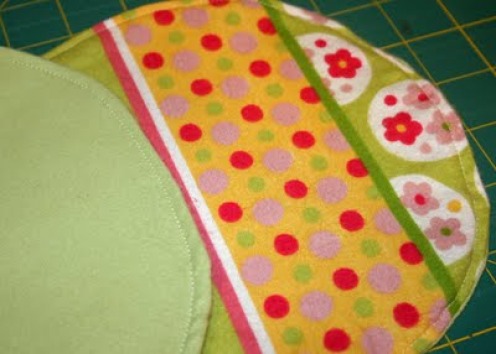 All Finished!!! 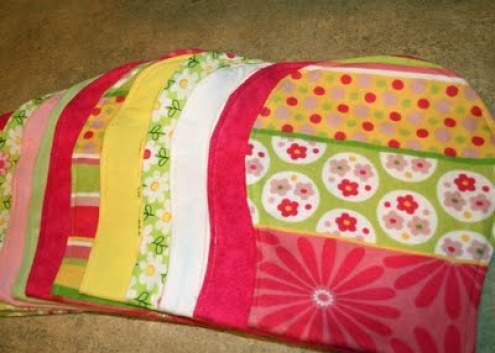 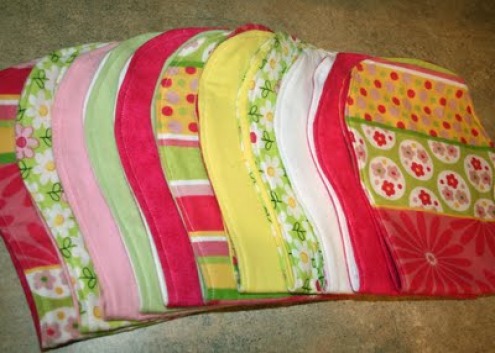 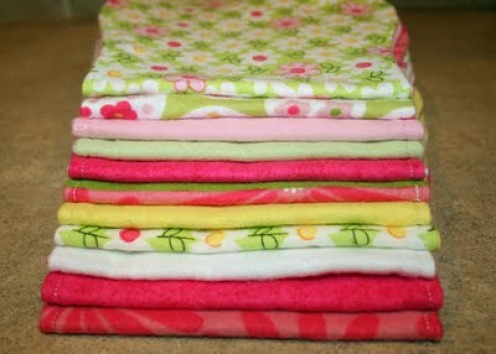 This was really one of those projects that the crowd goes wild for at the Shower. It's unique, and handmade. You can also dress these up a bit more and add some Ric rack around the edging..If you have an embroidery machine you can monogram them. You can make them square, or design your own shape. Its all up to you! 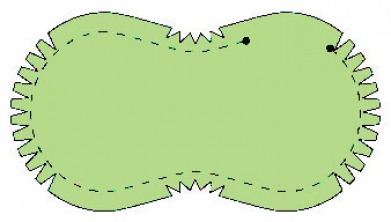 Additional tips from Daogreer Earth Works: Before you turn your shape right side out, clip along your seam allowance on the curves like the diagram above. This will allow your seam allowance to lay flat inside your burp cloth.  |
Topics
All

Archives
May 2021
|


 RSS Feed
HOME |
PHOTOGRAPHY COLLECTIONS
|

© COPYRIGHT 2020. ALL RIGHTS RESERVED.
|